Hello you lovely visitors and welcome to my little blog. Hope you are enjoying your day. A very special welcome to my new followers. Thank you so much for joining me on my crafty journey!! Hopefully, I can give you some inspiration now and then.
So, as promised, here is the step by step for the Christmas Planner I shared in my last post.
If you've been to have a look at it you would have seen it is nothing fancy .. I wanted to keep it simple because it's going to be used quite a lot over the next couple of months and, hopefully, in years to come as well.

This is going to be a very long post so, grab yourself a nice cuppa and a comfy chair and here we go!!
The Inside Pages
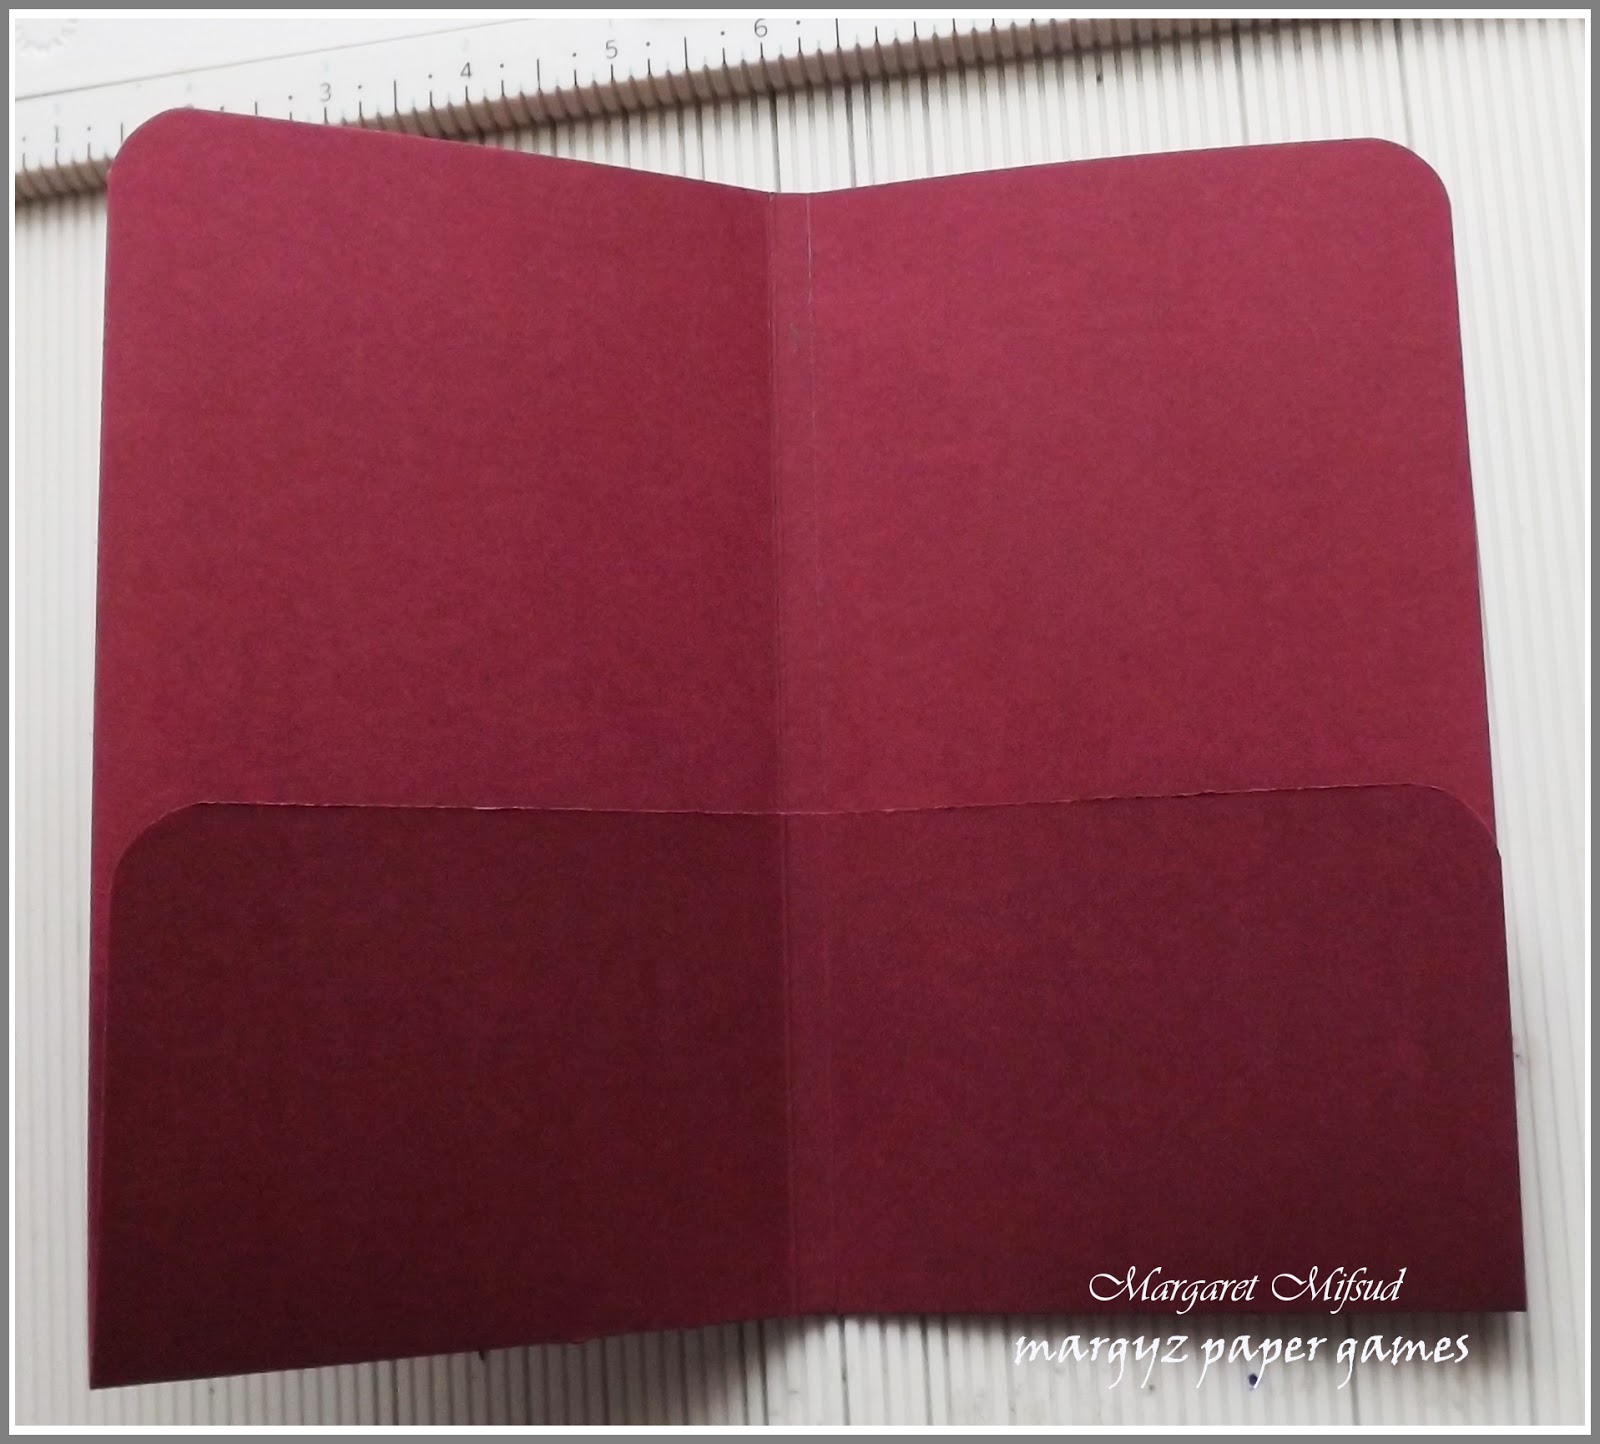
Score your card stock on the long side, at 7".

To create the gusset, score on the short side at 4" and again at 4.25". If you're using an A4 sheet like I did, it will be the tiniest bit wider than 8.25" so, simply find the center of the short edge ..

line it up on your score board (I lined it up on the 5" mark) ..

.. and score 1/8th" on either side so that you have a quarter inch scored section running down the center of your sheet.

I rounded the corners on mine but, of course, that is optional.

Fold along the score lines

Run a line of glue (I used Glossy Accents) along the gusset in the 3" section ..

.. fold up the bottom and press it down to create the pockets. You can glue the outer edges down as well but I didn't bother because it is much easier to insert your lists and receipts if the outer edges are left open. It will still hold everything in place.

This is going to be a very long post so, grab yourself a nice cuppa and a comfy chair and here we go!!
The Inside Pages
You will need:
Two sheets of Card stock 8.25" x 10". I actually used two sheets of A4 and simply trimmed the length down to 10".
Designer paper to decorate.
Double sided tape for adhering your papers.
A small amount of wet Glue.
Score your card stock on the long side, at 7".

To create the gusset, score on the short side at 4" and again at 4.25". If you're using an A4 sheet like I did, it will be the tiniest bit wider than 8.25" so, simply find the center of the short edge ..

line it up on your score board (I lined it up on the 5" mark) ..

.. and score 1/8th" on either side so that you have a quarter inch scored section running down the center of your sheet.

I rounded the corners on mine but, of course, that is optional.

Fold along the score lines

Run a line of glue (I used Glossy Accents) along the gusset in the 3" section ..

I would suggest that you decorate the inside of your pages at this stage. You can do it once the book is assembled but it is a lot easier to do it now. Don't decorate the outside as yet though.

Repeat this process with the second sheet.
The Cover
Lay all three pieces of chipboard flat on your work surface (as shown) lining up the edges and leaving a small gap (about an eighth of an inch) between each one for movement.

Then, tape the three pieces together. I used Cloth Tape (available at Hardware Stores like Bunnings) but you could use Duct Tape, Cardstock, fabric, anything that will hold the cover in place and still be flexible for opening and closing the booklet. Whatever you use needs to be at least 2" wide. This is enough to cover the spine and give you just over half an inch on either side. Turn the cover over and also tape the other side in the same way. On the inside, run an embossing tool between the cover pieces so that the tape sinks into the crease. This will help to ensure that it will open and close properly.

To add the pencil loop, take the 3" piece of elastic, loop it around the pen or pencil you wish to use and sew the loop closed. Then use a hot glue gun to tape the ends to the cover making sure the loop sits in the center of the spine. I staggered the ends of the elastic so it wouldn't be quite as bulky under the inserts.

This is how it looks at this stage.

To add the elastic closure .. on the outside of the cover, mark where you would like it to sit ..

.. and glue approx. 1.5" of the elastic to the top of the cover using your hot glue gun. Run your elastic around the back of the cover making sure not to get it twisted and glue the other end 1.5" to the bottom of the cover. As you can see, I had already started putting on the double sided tape ready to add the papers before I remembered to take a photo of where I stuck the elastic. Got a bit over enthused I think! LOL!!

Here it is, all closed up and ready to decorate!!

Now, I know you are all well versed in how to adhere your selected papers to the cover of your book, but I thought I would show you how to glue it down around the elastic closure.
Turn the elastic to the inside of the back cover and then adhere your paper to the outside. As you can see I only took my paper to the edge of the cloth tape. I didn't bother trying to cover the spine. I did say this was clean and simple didn't I?? Wasn't kidding!! LOL!!

Turn the book over. You now need to slit the paper so as to accommodate the elastic.

I've drawn a pencil line showing where you need to slit the paper .. from the edge straight down to the center of the elastic.

Turn the book over again. and make a tiny slit on each side of the cut to the width of the elastic as shown. Sorry for the blurry photo. I didn't realise how fuzzy it was until after I had already finished the book, but I think you get the idea.

Turning the book back again (getting repetitious isn't it?? LOL!!) place double sided tape all around the edge of the cover. You need to stick down the top and bottom edges of the paper first. On either edge (doesn't matter which one you do first), start folding the paper over, gently ease it around the elastic (being careful not to tear it) and stick it down.

Then do the same for the other side.

Once the top and bottom edges have been stuck down, turn the elastic back to the outside of the cover.

Before folding the end edge over you will need to trim the corners of the paper so it will sit neatly.


And here is the cover, all finished!!

Now to add your pages.
Adhere double sided tape on both sides of the inserts. You need to decide how you want this planner to open up. If you are doing it the same way as mine, the closed end of the insert needs to go to the outside edge of the Planner. Adhere your selected paper to the front of the insert.

The Cover
You will need:
2 pieces of chipboard measuring 5" x 7". Cardboard is also suitable or anything really that has a bit more strength to it. You could just use cardstock but it wouldn't be as sturdy.
1 piece of chipboard measuring 5/8th " x 7" for the spine.
Cloth tape.
Elastic - 3" for the pen loop and 10.5" for the closure. I used two different widths of elastic but the same width could be used for both.
Designer paper to decorate.
Double sided tape.
A small amount of wet glue.

Then, tape the three pieces together. I used Cloth Tape (available at Hardware Stores like Bunnings) but you could use Duct Tape, Cardstock, fabric, anything that will hold the cover in place and still be flexible for opening and closing the booklet. Whatever you use needs to be at least 2" wide. This is enough to cover the spine and give you just over half an inch on either side. Turn the cover over and also tape the other side in the same way. On the inside, run an embossing tool between the cover pieces so that the tape sinks into the crease. This will help to ensure that it will open and close properly.

To add the pencil loop, take the 3" piece of elastic, loop it around the pen or pencil you wish to use and sew the loop closed. Then use a hot glue gun to tape the ends to the cover making sure the loop sits in the center of the spine. I staggered the ends of the elastic so it wouldn't be quite as bulky under the inserts.

This is how it looks at this stage.

To add the elastic closure .. on the outside of the cover, mark where you would like it to sit ..

.. and glue approx. 1.5" of the elastic to the top of the cover using your hot glue gun. Run your elastic around the back of the cover making sure not to get it twisted and glue the other end 1.5" to the bottom of the cover. As you can see, I had already started putting on the double sided tape ready to add the papers before I remembered to take a photo of where I stuck the elastic. Got a bit over enthused I think! LOL!!

Here it is, all closed up and ready to decorate!!

Now, I know you are all well versed in how to adhere your selected papers to the cover of your book, but I thought I would show you how to glue it down around the elastic closure.
Turn the elastic to the inside of the back cover and then adhere your paper to the outside. As you can see I only took my paper to the edge of the cloth tape. I didn't bother trying to cover the spine. I did say this was clean and simple didn't I?? Wasn't kidding!! LOL!!

Turn the book over. You now need to slit the paper so as to accommodate the elastic.

I've drawn a pencil line showing where you need to slit the paper .. from the edge straight down to the center of the elastic.

Turn the book over again. and make a tiny slit on each side of the cut to the width of the elastic as shown. Sorry for the blurry photo. I didn't realise how fuzzy it was until after I had already finished the book, but I think you get the idea.

Turning the book back again (getting repetitious isn't it?? LOL!!) place double sided tape all around the edge of the cover. You need to stick down the top and bottom edges of the paper first. On either edge (doesn't matter which one you do first), start folding the paper over, gently ease it around the elastic (being careful not to tear it) and stick it down.

Then do the same for the other side.

Once the top and bottom edges have been stuck down, turn the elastic back to the outside of the cover.

Before folding the end edge over you will need to trim the corners of the paper so it will sit neatly.

Once it's stuck down you can round your corners if necessary. As you can see, the paper doesn't sit flat once you've done your corners but I simply stuck it down with some wet glue.

And here is the cover, all finished!!

Now to add your pages.
Adhere double sided tape on both sides of the inserts. You need to decide how you want this planner to open up. If you are doing it the same way as mine, the closed end of the insert needs to go to the outside edge of the Planner. Adhere your selected paper to the front of the insert.

Remove the backing from the double sided tape, center the insert on the cover and stick down. You can see that it leaves about 1/2" of the cover showing on both sides of the insert. It doesn't really matter how far in from the outer edge you glue your insert, but you must leave at least that 1/2" on the inside to accommodate your pen or pencil when the cover is closed.

Adhere the other insert to the opposite cover and, that's it.. your planner is finished!! You can, of course, add any other decoration you wish.
About the lists, I created my own in excel but, unfortunately haven't yet worked out how to convert them to PDF so I can't offer them to you. I am still working on it though and hope to get it done (with a little help from a friend) soon.
I hope I have made these instructions reasonably clear but, if you have any questions, simply leave your query in the comments section with a way for me to contact you and I will get back to you with the answer.
Thank you so much for taking a look at my little step by step and sticking with me to the end. If you decide to create your own planner based on these instructions, please let me know as I would really love to see it.
Enjoy the rest of your day.
Take care and God Bless.

Wow, Margaret, a gorgeous planner and thank you kindly for sharing all the awesome details and steps.
ReplyDeleteOh Margie, thank you so very much!!! What a brilliant tutorial, I am definitely going to try and make one. The whole idea of the elastic is so clever. Thank you for doing this, I know how much work goes into it, I really, really appreciate it!!! Off to pin.....
ReplyDeleteLove it Margie....it's a great little planner & most of all, I REALLY liked the clear pictures and directions for doing the cover. THANK YOU :):)
ReplyDeleteGoodness Marg you are so clever to create like that and then to take the time to share the steps by steps.. Thank you for sharing! Your album is amazing! Enjoy the weekend.. We are having a wet one so far!
ReplyDeleteThis is awesome! Thank you so much for such detailed instructions! I can't wait to give it a try!! :)
ReplyDeleteGreat tutorial! Thanks for sharing on Facebook! (FB is how I "found" you.)
ReplyDeleteHappily your newest follower! Have a good weekend. :)
great pictorial.
ReplyDeleteWow - you can make anything! This is so clever and practical! I love it!
ReplyDeleteWOW that is great. Would make a fabulous gift.. I know a couple of people who make lists and would love this for Christmas... hmmm you have given me an idea. I may have to lift this one. Love it.
ReplyDeleteExcellent tutorial! Thank you very much!!
ReplyDeleteIt is awesome list.I wasn't aware of this feature of this article.Home school tutor Greenwich thanks!
ReplyDelete