Saturday 22 February 2014

... And a Step to the Side!!

Hello everyone and welcome to my blog.
  So pleased to have you visit, and I hope you are having a lovely day.  
We've got some beautiful weather here in Adelaide today.  After a couple of very overcast days, the sun is showing it's face again.  It is very pleasant outside.  
So, what an I doing here, inside then???  Well, I wanted to show you my latest card. 
 This time, as you probably guessed from the Title, it is a Side Step card.
 The papers used are from Pion Design.  I so love the subtle patterns on these papers, they are gorgeous!  The top layer was curled at opposite corners and I coloured the back a little for contrast but, as I wanted to keep the monochromatic colour scheme, I just distressed the edges but didn't ink them.   
 Placed some gauze down first and then adhered my flower cluster on top.  The little velvet flowers are available from Meg's Garden, the small rose from Kaisercraft but the rose bud, the white flower and the tiny pale yellow ones are from my stash.  The stamens are also available at Meg's Garden.  You can find the store HERE.
 The two flower clusters are a mirror image of each other.
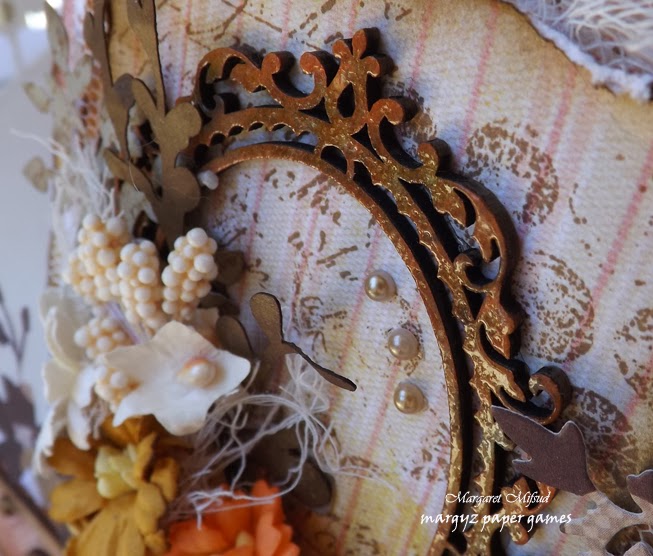
 The bit of texture was added using The Crafter's Workshop's 'Mini Ferns' Stencil and home made texture paste.  I originally coloured it the same as the back of the curled paper, but it didn't stand out as well, so I simply painted over it with gesso, although I did leave some of the colour on the paper.  I do sort of like that shadow effect.  The chipboard border is from Little Birdie and I simply painted it with white acrylic paint.
 The stenciling on the side panel is the same as on the front of the card except that I didn't colour it this time.  The tiny gems were added randomly around the card for a little bit of bling.
 The center strip is simply some gauze attached to a strip of the paper which was then tied with a twine bow and wrapped around the top layer.
 View of the card taken from each side to show how the Side Step looks. 
... And there you go ... all done!!   
I expect a lot of you probably like the clean and simple approach to card making, but I love distressing the edges and manipulating the paper to look like it's been used and abused.  It just adds so much interest to it ... well it does in my opinion anyway.   Don't get me wrong, I have seen a lot of totally gorgeous cards where the paper was lovely and flat and new looking but I for one simply love it when it's a bit messy and grungy, even on light coloured 'pretty' cards like this one.  I actually feel I haven't crumpled this one up enough, but I do love the way it turned out so it will have to do and, regardless of how you prefer your cards, I hope you like it too.  

Thank you so much for visiting  and I do hope you enjoy the rest of your day.
Please take care and God Bless.
oxox Marg

Monday 17 February 2014

Woo Hoo!!! I am a Winner!!

Hi everyone!!
Just a quick little post because I have just discovered that I won the Challenge over at Crafty Card Makers.  
It was Challenge # 109 This is a Man's World and I Am A Winner!!!  Woo!! Hoo!!

My Winner's Badge ...

 ... and the card that won!!!


I would like to thank all the ladies at Crafty Card Makers but especially Carole who was the host for this Challenge and who actually chose my card.  Thank you, thank you, thank you!!!

Feeling good right now!!!!

Thanks for dropping by and sharing in my joy!!!

Take care lovely people and God Bless.
oxox Marg


Center Step

Hello everyone and welcome to my bloggy space!! Lovely to have you here.
I'm back to share another card with you and it is another center step card, a feminine one this time.  I still have a lot of masculine cards I need to make but keep getting side-tracked.  It's the flowers, they distract me every time.  LOL!

The papers I've used this time are from Prima's Sunrise Sunset Mini Pack.  All edges are distressed and inked with Walnut Stain Distress Ink.  I've layered some netting in between the papers and added a little gauze in one corner and a die cut as well.  The Die is the Honey Blossom Sprig Die  by Memory Box.  I think the paper I've used for the die-cut is actually from Kaisercraft.

 Did some lacing on the side panels by simply punching the holes and then using embroidery thread for the stitching.  Have seen this on so many other peoples' creations, I thought I would give it a try.  Must say I quite like it.  I know Miranda Edney does this quite a lot and I've also seen it on Heather Jacob's  work.
 The flower cluster is made up of some daisy type flowers from Seriously Scrapbooking ( I don't know the Manufacturer ) a small rose from Kaisercraft and a small spray from Ribtex.  There's also some gauze and die cuts as well.  The dark brown branch was actually cut with my Silhouette and the fern is a Joy Craft Die. 
The chipboard frame is from Little Birdie which I've coloured with Brown and Olive Versa Color and then coated in clear embossing powder.
The wooden flourish is from Kaisercraft. I've left it raw and just inked the edges with Walnut Stain Distress Ink. 
 Attached the usual strip of border punched paper on the inside.  The border punch used is Martha Stewart's Doily Lace Die.
As those of you who have visited here before probably realize, I quite enjoy making these Center Step cards.  They are a little more involved than the normal type of card because of the number of panels that need to be decorated.  It's not just the one surface, and I find it keeps the creative juices flowing and the brain working just a little harder to get it all to blend together.  Love it!!

That's all for today good people.  I do thank you so much for coming and hope you've enjoyed the visit.  
Take care and God Bless.
oxox Marg


Friday 14 February 2014

Altered Box for Meg's Garden

Hello everyone and welcome to my blog.  So nice of you to stop by.
Hope your day is going well and that the weather is being kind to you.
We are getting the most wonderful rain in Adelaide at the moment.  It has been coming down steadily since yesterday morning and, apparently, there is a whole lot more on the way.  I absolutely love it.  It's coming down nice and steady and everything smells and looks so fresh and new. We really needed it too.  It is wonderful!!
I have a new project up on the blog at Meg's Garden.  It is a small altered box and here is a little sneaky peek for you.

For more piccies and all the details please visit Meg's Garden Blog HERE and perhaps, leave a little comment there as well.  That would be lovely and much appreciated..

Thank you so much for visiting.
Take care and God Bless!!
oxox Marg


Monday 10 February 2014

Masculine Step Card

Hello lovely ladies, and, possibly, gents!!  Welcome to my little crafty space.
Hope your day is going well so far.
I'm here to share another step card with you but it's a step card a little different from the norm.
I'm not sure whether it's a 'crossover' step card or a 'tag' step card or maybe even a crossover tag step card.  Yeah!!  I agree, that sounds just a little ridiculous!!  lol  To explain, I really love Crossover Cards.  You know, the ones that look like an open envelope with tags inside.  I also love Step Cards, so I decided to combine them into one card. Now, I'm probably not the first person to do this, but I haven't actually seen any around so I can't give anyone else credit for this.  The inspiration for this card actually came from Heather Jacob who has made some gorgeous Tags in a Pocket just recently.  The tags are based on her design but I wanted my card to be a bit different.  If you'd like to take a look at her incredible creations, you can find them HERE.
Anyways, here is my card.
 I've used Kaisercraft's Art of Life Paper Pad for this.  Other than the little button at the bottom, all the labels, etc. are from this Collection.
 All the papers are distressed and then edged with Walnut Stain Distress Ink.  I've also added a little doodling around the edges as well.  Another inspiration from Heather.
 The film strip and the labels, as I said before are from the Paper Pad and also from the Collectables.  They've all been layered with foam dots to give them dimension.  The top piece has been covered in clear embossing powder.
The tags, as mentioned before, are based on Heather's design.  The labels are from the same collection and then I've simply folded some of the paper over the top of the tag and added the eyelets  and the twine.  As you can see, I've also attached a smaller tag to one of them for added interest.
 Here is the inside ...
 ... and a closie showing the build-up of the layers.
So, there you are ... a Centre Step Crossover card.  Hope you like it.

I've decided to enter this card into the Challenge at Crafty Cardmakers and More ...

Thank you so much for coming by for a visit and for any comments you may leave.  I read every single one and really appreciate you taking the time.
Take care and God Bless.
oxox Marg

Saturday 8 February 2014

Art Journal - 'Bird House'

Hello everyone and welcome to my little blog.  
It has not been a nice day today weather wise.  We're suffering through another heat wave in Adelaide and it is not pleasant at all, although perhaps I'd rather have the heat than the masses of snow they are getting in other parts of the world.  I guess extreme weather is something we will always complain about, no matter which extreme we get.  Have to make the best of it I guess.
Anyway, I thought I'd share my next Art Journal page. 

 My background was, again, created with Distress Inks.  Some watered down 'Brushed Corduroy' and 'Broken China' were sprayed on and then flicked around the page, and then I dabbed 'Shabby Shutters' through some sequin waste.  
Then did the stamping using Kaisercraft's 'Arty', 'Crackle', 'Tic Toc' and 'Grafiti' stamps in Memento's 'Tuxedo Black'.    
 Stamped the Bird on some tissue paper and coloured it with water colour pencils.  It was then glued on with Multi-Medium and did the same with the Bird House in the picture below. 
Both of these stamps came with a magazine I bought quite a while ago and have no idea of who produced them. 

 The words I've used here are part of a quote ...


... by Albert Einstein.  Unfortunately, I can't give you the rest of it because I forgot to write it down and this was all I remembered.

I printed it on some tissue paper and then also glued it on with the Multi-Medium.  Then I just edged the page with Walnut Stain Distress Ink and it was done!!
I usually work on this Journal in between other projects so it takes me quite a while to do a page but I really love it.  I find it very therapeutic and soothing.  

Once again, I'd like to thank you for visiting.  I really appreciate you taking the time.
Please take care and God Bless.
oxox Marg
  

Wednesday 5 February 2014

Cards for Meg's Garden #2

Hello everyone and a very warm welcome to you all.
I hope you are having a fabulous day and that the weather is being kind to you.
I am here to share the second card from my Meg's Garden DT project.  
 The base of the card  is a pastel pink cardstock  and, as with the previous card, the papers used are from the 'Dreaming in the Meadows' Mini Pack.  For this card I machine stitched around the edge to create a bit of a frame for the design.
 The die cuts are Couture Creations 'Starburst Doily Die', and 'Oval Nesting Dies' and Marianne Creatables 'Frame & Swirls'.  The banner was cut from the cardstock by hand and layered with the same paper.  The floral sprigs were cut with the 'Honey Blossom Sprig Die' from Memory Box.
 The gorgeous flower is the Ivory Primula to which I've just added some autumn leaves.
 Just a close-up of the sprigs and the gorgeous design on the Meg's Garden papers..
 For the inside I've simply cut two strips of paper and edged them with Martha Stewart's Doily Border Punch.
This card and the one in my previous post are similarly constructed and yet are very different.  When you find a design that you love, you can use it again and again and by just changing the paper or adding or changing a few elements, your cards will look very different and no-one would know they are actually the same design.

Meg's Garden products used
S118 - Dreaming in the Meadows Mini Pack
325iv - Ivory Primula Flower

Why don't you pop over to the Meg's Garden Blog and take a look at the awesome projects created by my Teamies.  You can find it HERE.

I am so pleased you dropped by and thank you so much for visiting.
Please  take care and God Bless.
oxox Marg

Monday 3 February 2014

Cards for Meg's Garden # 1

Hello everyone and welcome to my blog.  
A very warm welcome to my new followers too, so pleased to have you here ladies!!
My DT post was up on the Meg's Garden Blog a few days ago but then I forgot to post it here ... duhhh!!!   Thought I'd better catch up on that before I do  anything else and forget again!!  lol
I actually made two cards this time and I'll show the first one here.  The papers are from the Dreaming in the Meadows Mini Pack.  I'll actually give you a list of the products used at the end of this post.
I used white cardstock for the base and layered the papers with some netting in between to give it a softer look.  I then machine stitched around the edges. 
 This corner was curled over and held down by a piece of bling cut from the Daisy Silver Trim to which I've added some tiny beads for extra colour.  I love that pretty lace and just had to add a little piece peeking out from the edge as well as the strip across the middle of the card. 
 The stunning flower is the ivory Heirloom 6.5cm which is, of course, also available from Meg's Garden as is the gorgeous lace.  The two die cuts underneath are Marianne Creatables Frame & Swirls Die and Couture Creations Starburst Doily Die.  The Starburst die cut was trimmed a little to fit in with the design.  The leaves were cut on my Silhouette and edged with white puff paint.
 The wooden flourish is from Kaisercraft and was coloured with Versa Color 'Olive' and I added another piece of the Daisy Silver Trim with the beads in the centre.
 The inside was lined with two more sheets  from the same collection.  These papers are so pretty you don't really need to add anything to them.  I love it!!!

As I said at the beginning of my post, I actually made two cards for my project.  This being the first  and I will show you the second one at a later date.
In the meantime, why not visit Meg's Garden and check out the amazing projects from my other Teamies.  You can find it HERE.

Here is the list of Meg's Garden Products used:
S118 - Dreaming in the Meadows Mini Pack
9213iv - Ivory Heirloom Flower
RBY36 - Daisy Silver Trim
L2920 - White 1.6cm Lace

Thank you so much for visiting and I hope you enjoy the rest of your day.
Take care and God Bless.
oxox Marg