Thursday 30 January 2014

More Positivity !!

Hi everyone and welcome to my blog.
I have been quite busy in my Craft Space lately  and I can actually post two days in a row.  Wow!!!  I even amaze myself sometimes.
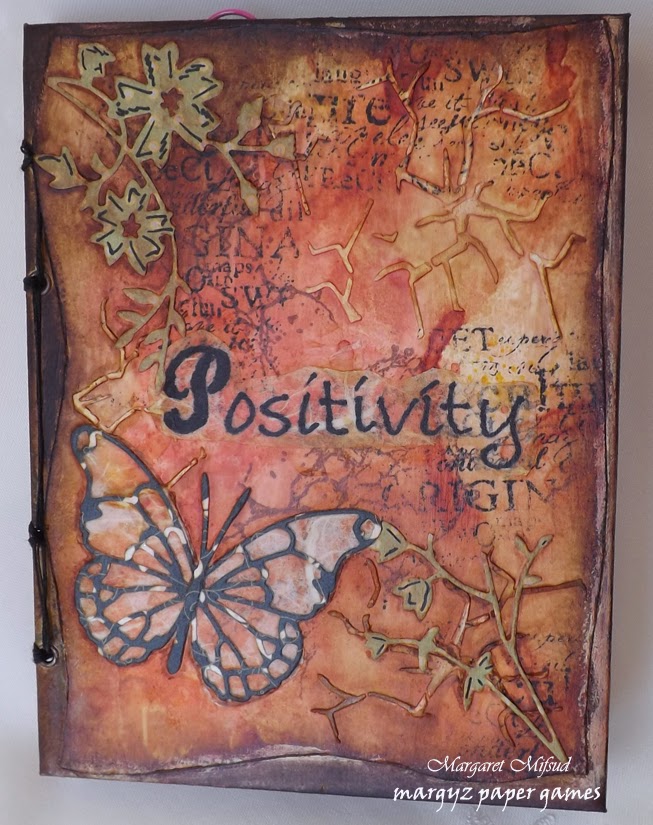
So, I am back this time to show you the first double page in my Positivity Journal!!
If you haven't come across this before and would like to know more, check out Astrid Maclean's post HERE.
First of all I'd like to show the inside cover of my Journal.
 Not a lot going on here but I found the quote on the left hand side on the net and felt it was very appropriate for this project.  I simply wrote it on some scraps of paper and glued them in with a few leaves and small flowers.
The journaling on the right simply explains what this journal is all about.  I printed that from my computer and glued it to the page along with the die cut leaves.
I am not actually writing in this book every day but I am recording special days such as Scrapbooking with my Granddaughter.  When I look back at the end of the year I will be able to recall those special days more readily.  Not that I will forget about spending time with my Granddaughter but now I will actually know which day it was.  LOL

Here is my first double page spread. 
The stenciling was done using sequin waste and Shabby Shutters Distress Ink.  When dry it was randomly sprayed with watered down Broken China D.I. and flicked with Faded Jeans D.I.   
The cursive writing, the clocks and the 'Cherish' stamps are from KC and were done in Coffee Archival Ink.  The music stamp is from Prima and was done in Faded Jeans D.I.  For the circles I simply pressed some different sized lids onto the Coffee Archival Ink Pad and then onto the page.  I also gave the 'Cherish' stamp a little extra colour with some watercolour pencils.
The two tags at the back are a Prima tag and I think it's from their 'Engraver' Collection.  I simply cut it in half so it would fit into the pocket.  The tag at the front is one I made myself.  I am using these tags to record my 'Positive' days. 
The butterfly was cut from a separate sheet of paper and then coloured with Mustard Seed and Shabby Shutters DI.  It was then stamped on the left with a KC floral stamp and on the right with the Prima Bold Print stamp.  The floral stamp was coloured with Reeves Watercolour crayons.  I have to say I am really happy with how this butterfly turned out.
Once it was coloured I glued the butterfly to the page and then drew the trail and the antennae with a Sharpie.  I also went around the outside of it with watercolour pencils to blur the edges a little.
When I wrote the quote on this page my pen was running out so I had to go over it all again with another pen so it's a bit messier than I would have liked but I am still happy with it. 
I will leave you with the same words - 
LIVE every moment.  LAUGH every day.  LOVE beyond words.

Thank you so much for visiting.
Take care good people and God Bless.
oxox Marg


Wednesday 29 January 2014

A 'Boy' Card and a Challenge!!!

Hello everyone and a very warm welcome to my blog.
Hope you are all well and having a lovely day.  The weather is a bit warm here in Adelaide but I think we're going to have to get used to it as we are heading into another 40+ heatwave.  Yuck!!

Anyway, to my card.  A few days ago, Brenda Caldow (one of my FB friends ) invited me to 'like' Scrapbookit's FB page and in doing so she urged me to enter their Challenge.  Now, as most of you will know, I don't really Scrapbook.  I did create a page a little while ago, but that was with my Granddaughter so it was a special occasion.  Brenda assured me though that they will accept cards, so here goes. 
There is a list of different criteria, and you have to use any three in your project.  One of the criteria is to use Kaisercraft papers.   
I wanted to use some brighter colours on this card so I chose papers from four different Kaisercraft Collections.  'Check In', 'Basecoat', 'The Looking Glass' and 'Pickled Pear'.  I love how you can mix and match KC Papers and it all still blends together so nicely.
 The next criteria I chose was to 'ink' the edges.  Well that was a no brainer.  I usually do ink my edges anyway and more often than not I use Walnut Stain Distress Ink which is what I used here.  Wasn't as heavy handed with it this time because I didn't want the card to become too 'grungy'.  
 The third criteria I chose was to use layers of patterned paper which, again, I do quite a lot so that was no problem either.  As you can see there are three layers of different patterned paper on this card.
 All the labels used are from 'The Looking Glass' 6 x 6 Paper Pack.
 I think I'm getting addicted to Centre Step Cards as I've made quite a few now.  Will be posting more of them later.
 The inside is decorated quite simply.  It will get a bit more treatment when I'm ready to add the sentiment.
So there it is.  Another 'Boy' Card done and a Challenge entered.  A good day's work I reckon.   
  
If you'd like to take a look at Brenda Caldow's Blog you can find it HERE.  
If you'd like to  check out the Scrapbookit Challenge you can find it HERE.

Thank you so much for visiting my little blog and, hopefully, leaving me a little love.  Always appreciated.
Please take care and enjoy the rest of your day.
God Bless.
oxoxMarg


Sunday 26 January 2014

Feeling Blue ... but in a very Happy Way!!!

Hello everyone and welcome to my blog.  So happy that you popped in for a visit!!  
I'd like to wish all my Aussie peeps a very happy Australia Day!!  Hope you all had a great time.
We had a lovely day here.  Hubby and I went over to a friend's house for a BBQ and thoroughly enjoyed ourselves!!  

Today I have another card to share and the reason I added the 'Happy' to my title is that this card is made with product from two prize wins!!!  The first, of course, being the gorgeous Pion Design papers which I've had for a while now, and the other is the prize I won from Scrapmatts through Helen Tilsbury's Blog Hop a while ago.  I actually received these chippies as I was making this card so they came in very handy.  A big THANK YOU to both Helen and Scrapmatts for my amazing Blog Hop win!!!!
You can find Helen's Blog HERE and Scrapmatts HERE.

Now, I should have been making more masculine cards but felt the need to do something 'pretty' so I made another feminine one, with flowers, of course.    
Here 'tis.
As stated before, the papers are from Pion Design.  I have thoroughly enjoyed creating with these.  The patterns are very subtle but oh so pretty!!  Unfortunately it doesn't really show up very well on these photos.
I love the ripped paper look, so went for that again here.  Distressed the edges but, as I didn't want them to look aged, I didn't bother to ink them.  I just crumpled them up a bit and did some doodling  around the edges with a white gel pen. 
 I used a scoreboard to create the lines on the base paper to give it that corrugated look as a bit of added interest and then cut a doily in half and inserted that between the two layers of DP.
The flowers are a mix of Prima, Kaisercraft and Ribtex and the leaves were cut on my Silhouette.   There are also some Magnolia Ink gem strays tucked in between.  Placed some gauze underneath the cluster as well, it just softens the outline a bit ...
... and here is part of my prize from Scrapmatts!!  The gorgeous Happy Birthday chippie!!!  I simply coloured it a little with some Versa Magic 'Cloud White'.  The blue ribbon is from my stash.


 Here is a better look at those gem sprays.
So, there we are.  A feminine card 'happily' made with two fantastic give-aways from two totally amazing Companies.   Thank you again to Pion Design and Scrapmatts and also, of course, to Helen Tilsbury.  You made my day guys ... Thank you all ... you are amazing!!!

And thank you too, my lovely visitors for dropping in and letting me share this with you.
Please do take care and God Bless.
oxox Marg

Saturday 25 January 2014

Meg's Garden DT Project

Hi everyone, so pleased you dropped by and hope you are all having a lovely day
My next Meg's Garden DT Project is up on the Blog.  
Here is a little sneak peek for you.


For all the details please visit the Meg's Garden Blog HERE and maybe leave a little comment there.
That would be really lovely.
Thank you for visiting.
Take care and God Bless.
ox Marg

Sunday 19 January 2014

Centre Step 'Grunge'

Hello everyone!!  Welcome to my little bit of blogging space.
A very warm welcome to my new followers too!!  So pleased to have you join me ladies and I hope you can get a little inspiration here.
OK, down to business.  I have a lot of masculine cards to make and I thought I'd better get started on them so I've come up with a fairly 'grungy' centre step card. 
The look I was going for was reminiscent of the rusted old worn out Garage they would show in the old movies.  You know, the dirty, grotty, untidy, messed up places out in the middle of nowhere, with all the old wrecks and junk sitting around the yard but where the mechanic is an absolute genius for fixing cars.   I think I kinda got the look I was going for.
 The papers used are from Kaisercraft's 'Garage Days' along with a few strips from their 'Base Coat' range as well.
The border strip is part of a note pad cutting file from Silhouette.  Grunged it up a bit with Walnut Stain Distress Ink and Versa Color silver.  The small label images were fussy cut from one of the Garage Days 6 x 6 papers.
 The cogs are also a cutting file from Silhouette and I coloured them the same as the border strip but with a little Versa Color Lapislazuli and some Kaisercraft Red Gum added in.
 The large 'Gas' label was mounted on some paper board to give it some height.
 For the inside I simply cut a border strip with Martha Stewart's 'Optic Dot" Border Punch and fussy cut a few more images from the paper.
 A few closies showing the layers ...

 ... lots and lots of layers.

I really like step cards.  I've made a couple lately but I think I might be making a whole lot more, they are very versatile and something just a little different from the norm.
I hope you like my Grungy Centre Step Card and are, perhaps, a little inspired to make your own.

Thank you so much for visiting, I'm really pleased you came.
Take care and God Bless.
oxox Marg


Thursday 16 January 2014

Me?? Scrapbooking???

Hello everyone and welcome to my blog.
Well, this is a post I never thought I would be writing ... I actually did some scrapbooking today!!  What!!!  You say??  Scrapbooking  ... You????  Yep!! Me!!
We had our 11 yr old Granddaughter Melanie here for a sleep-over last night.  Because of the heat ( it was over 40 degrees here in Adelaide for the fourth day in a row) we decided to stay home today and create a scrapbook page of their dog "Sully" (Short for Sullivan).
It was the greatest fun.  I absolutely loved it and I think she did too.
So, here is our page!!
 The photo was taken not long after they brought the dog home which was about 6 months ago.  He's a lot bigger now, and I mean a LOT bigger!!  Anyway I showed my DGD (Darling Granddaughter) some layouts on my Pinterest Board and she chose a design made by Di Garling.  Di creates the most amazing pages.  This one is from a couple of weeks ago and, If you would like to take a look, HERE is the link to her blog.  Mel absolutely loved the tears in the paper and that is why she chose this particular page.
So the papers were chosen from the limited stock of 12 x 12's I have in my stash (I have no idea where they are from) and we used black cardstock as our base.  Melanie actually did the ripping of the paper and I really think she thoroughly enjoyed that too. So then we did some spraying with diluted 'Broken China' Distress Ink and some stamping, this time with 'Faded Jeans' Distress Ink, added a bit of Washi Tape and also splashed a bit of diluted "Brushed Corduroy' Distress Ink around the page.
The flowers are a mix of Dusty Attic, Prima and Kaisercraft and the chippies are from Little Birdie.  Simply coloured them with Versa Magic "Cloud White' and Versa Color "Lapislazuli.
The clock is from Scrapbook'n'Craft and was coloured with Versa Color "Lapislazuli and then mounted on some paper coloured with the same ink.

Our page didn't turn out anything like Di's original  but then it was never meant to.  We just used the basic design and I am happy to say that Melanie was very pleased with the result and was very proud as she showed her Mum and Dad after we took her home.  Unfortunately, we didn't have time to do the Title which will simply be the dog's name but I will get that cut out some time at a later date and then Mel can add it to the page.
This may be the only Scrapbook page I ever create and the fact that it was done with my Granddaughter really makes it very special for me.  It was a really fabulous day!!

Thank you so much for visiting and hopefully leaving a little comment so I can pass it on to my Granddaughter.   We both would love to know what you think.
Take care and God Bless.
oxox Marg

Sunday 12 January 2014

Positivity Journal

Hello everyone!!  So pleased you've come for a visit!!
Today I'd like to share a little Journal with you.  Those of you who visit Astrid Maclean's Blog will know all about this one.  At the end of last year Astrid posted about a Journal she was starting up and invited others to join in with her.  Each day you write down something positive that happened, such as someone who smiled at you, or opened a door for you or even seeing sunshine through the trees, just something nice that happened to you that day.  To keep a record of all these things, create a little Journal to keep them in.  If you'd like to see that post HERE is the link.
I thought this was such a lovely idea that I just had to join in, so I created this Journal just for that purpose.
As luck would have it, my DDIL Kerry-Jean Watson had just learned how to make books using Coptic Stitching so I asked her to teach me and that's how I put this little book together.  I don't think Kerry-Jean actually did a post on the books she's made yet but if you'd like to have a look at her blog you can find it HERE. What I really love about this method is the fact that the pages sit really flat ...
which makes them so much easier to decorate.  The papers I've used are ones that have been in my stash for a long, long time and they are quite thick and sturdy so hopefully I won't have too much trouble with them when I ink and spray.
Here is the back of the book.  All I've done here is inked the edges with Walnut Stain Distress Ink ...
... and here is the front.  It was actually covered in the same paper as the back and then I used a separate plain sheet of paper to decorate it.
 To colour the background I used Distress Ink in Fired Brick, Mustard Seed and Walnut Stain.  Simply pressed each of them fairly close together onto my non-stick mat and then swiped the paper through it.  For texture I used the Cracked Paint Stencil by Scrapbookingncraft with my homemade texture paste and also did some stamping with a text stamp by Prima.
The die cut is Memory Box's Honey Blossom Sprig which I cut in two and glued to separate corners. 
I wrote the Title on some tissue paper with a Sharpie pen and then simply glued it onto the cover.  It doesn't blend in quite as nicely as I would have liked but I am fairly happy with it anyway.
The Butterfly die cut is Memory Box's Vivienne Butterfly.  I mounted it on some tissue paper, trimmed around it and then simply glued it onto the cover sheet.
 Here is the other half of the Honey Blossom Sprig die cut.
I did a bit of shading around the die cuts, etc. and also a little bit of edging in gold acrylic paint
and that's it.  My Journal is ready to go.
If any of you are interested, please visit Astrid's Blog for the full details and let her know that you wish to join in.  There is a logo that you can get as well.  You can see it on my side bar, this shows everyone that you are a part of this project.  I am really enjoying this, it is a lot of fun and a great reminder that good things happen even on bad days.

Thank you so much for visiting and I do hope you will take part in this Positivity Project, I'm sure you'll enjoy it as much as I am.

Please take care and God Bless.
oxox Marg