Monday 26 March 2018

Crafty Cardmakers Challenge #208 - Bunnies, Chicks or Eggs

Hello dear visitors and welcome to my blog.  So nice to have you drop by.

The new Challenge has gone live at Crafty Cardmakers and, as Easter is so close, it's all about Bunnies, Chicks or Eggs.  Our host is the lovely Kim and, as always, you may create anything you like for this Challenge as long as it meets the Bunnies, Chicks or Eggs Theme.

I decided to use Eggs on my card.  Mainly because I had no images of Bunnies or Chicks and couldn't find anything I really liked on the net.

Doing a bit of stash busting here.  I have had these papers for ages (years actually) and thought it was time to use some of them.  They are from a Collection called Pink Gelato, a really old one from Kaisercraft but very pretty.
I've had this flower in my stash for a long time too .. didn't actually realise I had any left.   It is a Burgundy/Cream Open Paper Rose and they are available from Megs Garden.  I love the colour!!
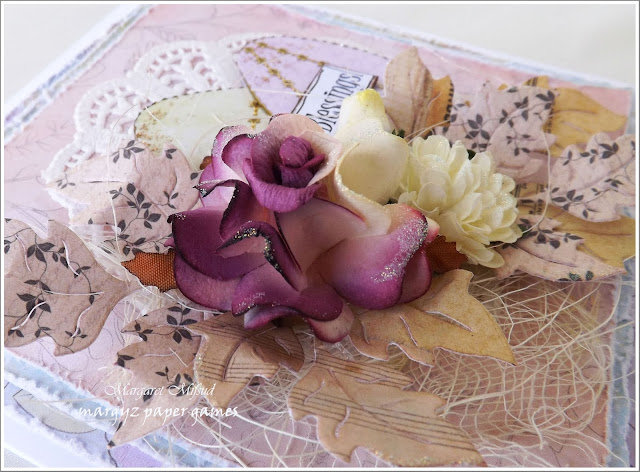
The rose bud is also from Megs Garden and the little white bloom is from my stash.  The leaves are a die from Cheery Lynn.
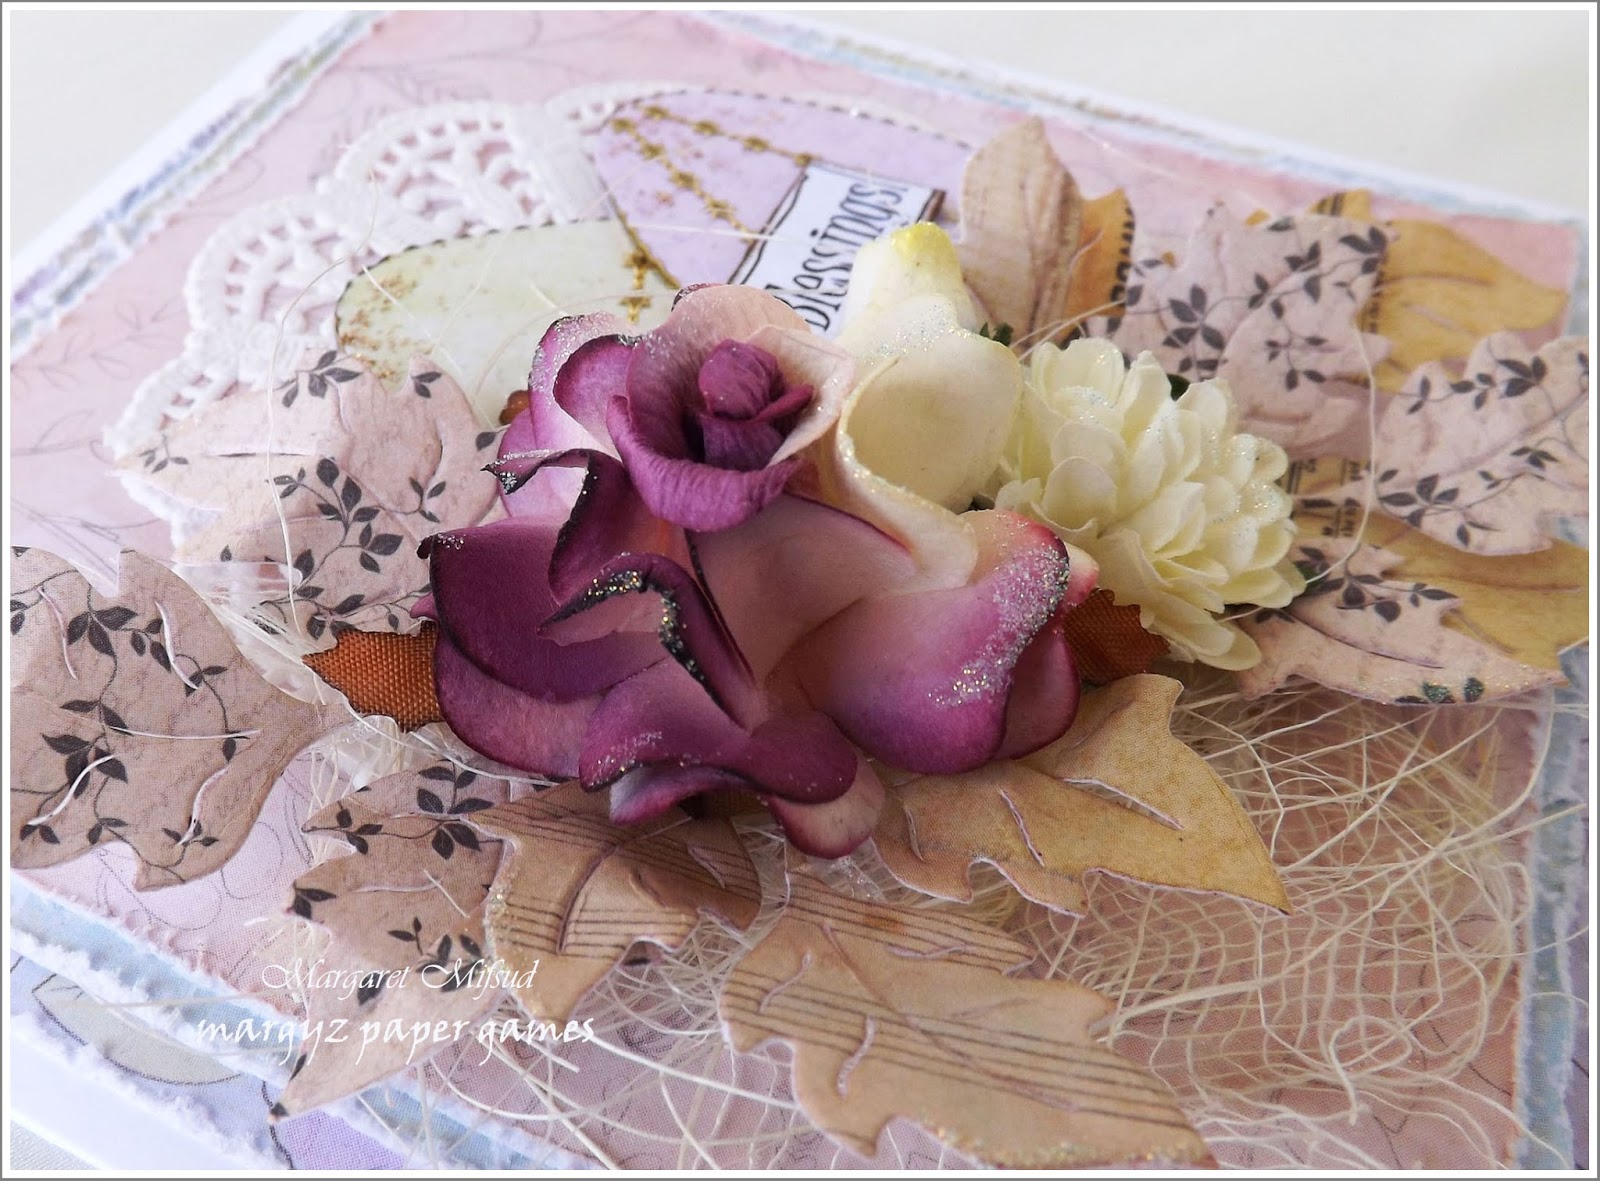
I made the eggs by cutting the shape out of chipboard and then covering it with more of the papers.  Added a few gold border stickers for decoration and sprinkled them with a little gold glitter.
I also sprinkled some clear glitter on the flowers and leaves but, unfortunately, it doesn't show very well on the photos.
Popped a bit of gauze and some sissal underneath the cluster.
The sentiment was computer generated and then mounted on a piece of chipboard.


Hope you will pop over and take a look at the fabulous creations by my Teamies and perhaps you'll be inspired to join in.

Crafty Cardmakers Challenge #208 - Bunnies, Chicks or Eggs

Looking forward to seeing what you create!!!

Hopefully it won't be so long between posts this time.  Just after my last post, I fell over in our back yard and ended up with a broken wrist.  Not badly broken thank goodness .. the bone didn't shift  (must say, it did hurt a lot though).   I didn't need a cast, but I do have to wear a brace for 4 weeks or so and I do have to be careful what I do.  It does still ache at times but is feeling a lot better now so, I should be able to get a bit more crafting done.  Yayy!!

I have entered this card in the following
Ellibelle's Creative Moments - Papercrafter's Linky Party
Make My Monday - Challenge #67 Easter Fun
 
Thank you so much for stopping by and I hope you enjoy the rest of your day.

Take care, stay safe and God Bless.
oxox Marg

Tuesday 13 March 2018

Crafty Cardmakers Challenge #207 - Go Green

Well, hello again my dear visitors, and welcome.  So happy you decided to stop by my blog.

It is time for another Challenge at Crafty Cardmakers.  This time around, Judy is our host and the Theme is Go Green.  Your creation doesn't have to be totally green but we would like the majority of it to be green.  In other words, please don't just pop a leaf in the corner and think it will qualify, it must be mainly green.

For a bit of a change from my usual card .. this time I have created a couple of ATCs.

The background was part of a masterboard that I created a while ago and never used.   Felt it was ideal for this Challenge.  The board was made with Distress Inks.   The colours I used are Forest Moss, Faded Jeans, Wild Honey and Mustard Seed.
I used some translucent texture paste through a harlequin stencil and, while it was still wet, I sprinkled it with white embossing powder and heat set it.
This is one of the few times that I actually managed to heat emboss something without getting the powder all over the place and making a mess.   Yayy me!!!
The chippies are from Imaginarium amd  I lightly coloured them with a VersaMark stamp pad in Laurel Leaf and then rubbed the edges randomly with Twinkling H2O's.   It looks a bit yellow in the photo but IRL it is a sparkly gold and looks quite pretty.
Attached a small Kaisercraft brad and added some prills and microbeads.

The second ATC is a mirror image of the first. 
I used all the same elements and just placed them on the opposite sides.
There is a little bit of stamping on the background and, the paper underneath the chippies are scraps left over from the previous ATCs I created HERE.  Some of the techniques I used on that set I have also used on these.
Both quotes were generated on my computer and I doodled around all the edges with a Sharpie pen. 
Finished off both ATCs with some splashes of black and white acrylic paint.
Another look at both ATCs together.
Quite happy with the way these turned out.  Hope you like them too.

Also hope I have given a little inspiration for you to join in with the Challenge and would love for you to  pop on over to the Crafty blog and take a look at the wonderful creations by my Teamies.   You are certain to get inspired then.  Looking forward to seeing what you create!!

To get all the details of the Challenge and to link up your entry
Crafty Cardmakers Challenge #207 - Go Green.

Thank you so much for stopping by today and for any little comment you may care to leave.

Have a wonderful day!
Take care, stay safe and God Bless.
oxox Marg


Thursday 8 March 2018

Create your Future - A Man Card

Hello dear visitors and welcome to my blog.  So pleased you dropped by.

Well, here I am with another of my 'man' cards to share.  Still have lots of these to make, although I've slowed down a bit with them.  Got a little too involved in creating some ATCs and everything else just got put on the back burner for a little while.  LOL!!

So, I'm still using up those re-discovered quote panels, and ('cos I'm being a bit lazy this year) I'm still using the same basic design but I'm also still managing to  make them look a little different anyway.  Don't want the guys on my list to think they are all getting the exact same card!  LOL!!
The papers are from Kaisercraft but I cannot remember where the tags came from.  I'm using up a lot of old stash for these cards and the memory is not as good as it used to be.  (Not that it was all that good to start with!!  LOL!!)   
The clock is a free printable which I cut out, mounted on some chipboard and then covered with Glossy Accents.
Wanted some extra embellies so, instead of using cogs as I usually do, I simply punched out a few circles of paper and attached them with a brad.  Probably should have inked the edges though.

 Again, for something a little different, I attached the twine with staples instead of inserting it through the holes.
No idea where I got that ticket either.  One of those little treasures you sometimes find amongst the rubbish.  Do wish I had some more of these though.
The full frontal ..
.. and another one completed!

Thank you so much for stopping by today and taking a peek at my little makes.  Very much appreciate your visit and any comment you may care to leave for me.

Have a wonderful day!!
Take care, stay safe and God Bless.

Monday 5 March 2018

ATCs - A New Addiction

Hello sweet visitors and welcome to my blog.  So pleased you decided to drop by.

I'm sharing something new with you today.  Well, at least it's new for me.  I have been busy creating some ATCs and, I have had so much fun with it,  I think I have a new addiction!  
Like everyone else, I have seen these around for a long time but never really felt the need to try my hand until now.  I've been watching a few videos, which is not unusual in itself but, I've been watching videos about ATCs.  I think I can blame Anne Redfern for this.  LOL!!  She mentioned her love of ATCs a few times recently and it got my curiosity aroused.

So, I watched a few videos and thought I would give it a go, and these are the result.
  I must tell you that these are not my own design.  Quite a few of the videos I watched used these techniques and I simply followed them.
The inspiration for my version came mostly from Shira Manor so these look very much like hers.  Here is the link to her video.

 So, basically, I made a Masterboard, and then cut it up into ATC sized pieces.  I ended up with 6 ATCs and the scrap was used for the collage.
I didn't take any photos of the process because, if you're interested, you can see it all on Shira's video.
 The substrate is watercolour canvas paper.   The layers started with a few papers from Simple Stories 'Documented' paper pad.  These were torn into strips and adhered to the canvas paper.
The next step was to add masking tape and washi tape.  Unfortunately I couldn't find the masking tape.  It has disapeared into our domestic black hole I think, so I used plaster tape instead.
Next came some stenciling with two different stencils and texture paste.  Before the paste dried I applied white embossing powder and heat set it.
Unfortunately, embossing powder is not my friend.  I can never apply it cleanly.  It just seems to stick to everything.  Even when I have rubbed the area with a resist pad, it still sticks and it is really hard to get it off the places I didn't want it to go.  Hence you can see it scattered everywhere.  Still, I don't really mind the look of it here.
So, once the embossing was finished it was time to add the colour.
I used a mix of Lindy's Stamp gang Sprays and Magicals. 
 The colours used in the Sprays was Sea Grass Green and Cape Cod Coral and
 in the magicals I used Tears on my Pillow Tangerine and TiffanyLou's Blue.
Once all the colour was dry it was time to chop up my Masterboard and, as stated before I ended up with six ATCs but, so far, have only completed these three.
The scrap was cut into smaller pieces for the collage and, once I got the arrangements to my liking they were simply stapled together but, before glueing them to the bases, I added some twine underneath.  I added a metal button to each ATC and then went round all the edges with a Sharpie pen.
Found some quotes on the net, printed them, cut them out and also edged them with the Sharpie.
The final step was to glue the quotes to the base.
A final look at all three together.
This was so much fun!  I loved getting messy preparing the Masterboard.  Should say, I was not really impressed when it was done but, once I got it all cut up and once my ATCs were assembled, I am really loving these.  Also, putting that black edging all around made a big difference to the look.  I love them!!! And I'm definitely making more of these.

Thank you so much for stopping by.   I really appreciate your visit and hope I have inspired you to try making some ATCs for yourself, if you haven't already.  Check out all the amazing videos, I'm sure you'll find something you haven't tried before!!

Have yourself a wonderful day!
Take care, stay safe and God Bless.

Thursday 1 March 2018

Dream, Believe - A Man Card

Hello my dear visitors and welcome!  So lovely that you stopped by.

I have another card to share today .. another masculine card.  This year, I am trying to get most of these done early so that I have them ready when needed.  Making feminine cards is easy.  I'm always ready to make those, but with male cards, I need to create as many as I can while I'm in the mood (which I am at the moment) otherwise I keep putting them off until it's almost too late.  

I am still using the same basic design I used in my last two cards HERE and HERE
If it ain't broke, don't fix it .. right??   Besides, I have all these fab quote panels to use up and they are working really well with these cards. Well, I think so anyway.  LOL!!
The papers are older ones from Kaisercraft.  I have a lot of their papers in my stash so it's really good to get to use some of it.
The clock was a freebie printed on the computer which I covered with Glossy Accents and I also added a strip of torn washi tape.
There's piece of torn corrugated board tucked in at the side.  I actualy lightly painted it with white gesso but didn't like the way it looked so went over it with black.  Looks a bit messy but that's ok.   It's a man card so it's allowed to be a bit messy.  LOL!!
Just couldn't resist adding some prills and microbeads ..
.. and a few metal cogs.
Added a few splatters here and there for a bit more interest.
Do love this quote panel .. it adds a lovely touch of colour!
Some more of the paper on the inside ..
.. and the full frontal!!
I'm quite happy with the way these cards are turning out.  Using the same basic design makes it so much easier in creating them.

Thank you so very much for dropping by today and for any comment you may care to leave.  Always very welcome and very much appreciated!!  Enjoy the rest of your day!

Take care, stay safe and God Bless!