Hello everyone. Welcome to my crafty place.
Hope you are having a wonderful day.
I'm here to share with you the Masculine Mini Album I created for my Guest Design spot over at Mini Album Makers Challenge blog. I had been wanting to create a masculine style mini album for a while and thought that this would be the perfect project for this post.
On the MAMC post, I shared the first half of the album and also shared how it was created. In this post, I will show you the completed Album. If you'd like to see the tutorial as well, HERE is the link.
This will be quite a long post so you might want to grab yourself a cuppa.
The outside of this album measures 5.5 x 6.5" and the inside pages are 4.5" x 6". The spine is 2" wide.
 The papers I've used are a mix from Studio Light's Industrial 2.0 paper pad and Kaisercraft's Factory 42 paper pad.
 The inside cover and the first page set.
I haven't done much embellishing in this album but I have added a few cogs here and there and a little bit of washi tape as well. I have also stamped some splatters and coffee stains, added a little stenciling and inked the edges of all the papers with Ground Espresso Distress Ink.
 I created two sets each in two different styles of pages. So, there are 4 page sets in this book but, as you will see, there are a lot of places for photos, etc.
This page set opens up firstly to the left as seen above ..

 .. which is tucked into a side opening pocket attached at the back.
 You may notice that I've added a few of Tim Holtz's Snarky Small Talk Stickers to this book. If you'd like to see them properly, simply click on the pictures to get a larger view.
 This is the back page of the first set and the first page of the second.
I have used a stacked hinge to bind my pages to the spine and have left a gap of about .25" in between each set so that the pages will sit nice and flat when opened.
 The back page of the first set has a double belly band which is held down by some magnets ..
 .. and opens up to reveal another photo mat. All of the above mats and pages are attached to, and held by, a single hinge.
 The second page set opens out to the right, and there is another underneath which opens out to the left. It also has a folded card tucked into a pocket which is attached at the back of the set but this pocket is open at the top..


 The back of the second set and first page of the next.
 This little flip up opens to reveal a double photo mat (or journaling spot).
 The next two page sets are the same design as the first two but, of course, I have used different papers (from the same paper pads) to decorate.


 The little flip up here is the same as the one from the second page set but I have changed it a little in that it opens up first and then flips up. The first one flips up first and then opens. I'd like to say that it was deliberate but I didn't realise that I actually put the papers on the wrong sides .. LOL!!
 I can actually still flip it the right way but I wanted the dark grey papers showing on the outside of it as it is a nice contrast to the papers underneath.

 The cover is made of chipboard. As you can see I used a piece of hessian style material to cover the spine and, although the material is glued down, I added the brads for some extra interest and strength. After all, this is a man's book and is going to get some rough handling! LOL!!

 The chippie decorating the spine is also by Little Birdie and was heat embossed similarly to the frame on the front.
This book is fairly plain but I really enjoyed working it all out and creating it. Between this book and the Junk Journal I created a while ago (you can see that here) I rediscovered my love for making books and I am itching to go and make another. Hopefully, soon.
Sorry that this is such a long post but I hope you managed to stick it out to the end and that you enjoyed seeing my little album. If you need some inspiration for your own Album making, pop on over and pay a visit to the Mini Album Makers Challenge blog. The DT ladies create the most amazing books and I'm sure you will find plenty of inspo there and, if you enter the Challenge, you will have the chance of doing a Guest spot as I did.
Happy album crafting everyone!
Take care and God Bless

Hope you are having a wonderful day.
I'm here to share with you the Masculine Mini Album I created for my Guest Design spot over at Mini Album Makers Challenge blog. I had been wanting to create a masculine style mini album for a while and thought that this would be the perfect project for this post.
On the MAMC post, I shared the first half of the album and also shared how it was created. In this post, I will show you the completed Album. If you'd like to see the tutorial as well, HERE is the link.
This will be quite a long post so you might want to grab yourself a cuppa.


I haven't done much embellishing in this album but I have added a few cogs here and there and a little bit of washi tape as well. I have also stamped some splatters and coffee stains, added a little stenciling and inked the edges of all the papers with Ground Espresso Distress Ink.

This page set opens up firstly to the left as seen above ..

.. and then the page on the right lifts up to reveal a folded card ..


I have used a stacked hinge to bind my pages to the spine and have left a gap of about .25" in between each set so that the pages will sit nice and flat when opened.


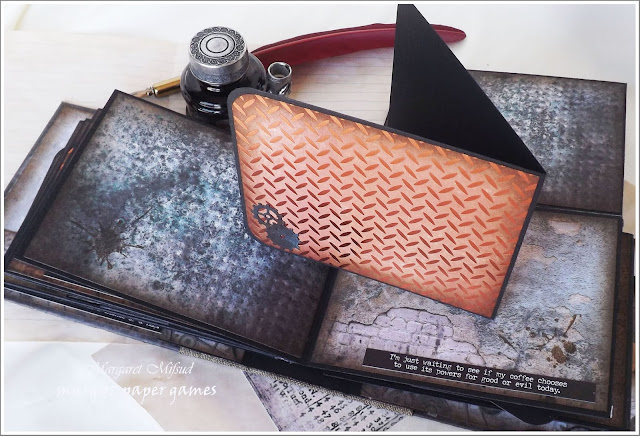
I used a piece of corrugated board under a chippie frame by Little Birdie and a word strip by Scrapmats, to decorate the front of the book. The frame was heat embossed with a mix of black and bronze embossing powder and the word strip was edged with Ground Espresso Distress Ink.

This book is fairly plain but I really enjoyed working it all out and creating it. Between this book and the Junk Journal I created a while ago (you can see that here) I rediscovered my love for making books and I am itching to go and make another. Hopefully, soon.
Sorry that this is such a long post but I hope you managed to stick it out to the end and that you enjoyed seeing my little album. If you need some inspiration for your own Album making, pop on over and pay a visit to the Mini Album Makers Challenge blog. The DT ladies create the most amazing books and I'm sure you will find plenty of inspo there and, if you enter the Challenge, you will have the chance of doing a Guest spot as I did.
Happy album crafting everyone!
Take care and God Bless

Wow, this is so amazing!! The pages and details are so stunning!! Every detail is spectacular!! Wow, it's gorgeous!! Have a great day!! Big hugs :)
ReplyDeleteLisa
A Mermaid's Crafts
WOW! This looks fantastic! Great choice of papers and such a wonderful detail selection.
ReplyDeleteSimply fabulous, Margaret!
Hugs
Samra
Paper Talk with Samra
Absolutely amazing Margy, so much gorgeous detail......... just love it xx
ReplyDeleteA fantastic masculine mini album Margaret. Beautiful made with lovely papers. I will follow your link and pin your tutorial on my pinterest boeard. Making an album is something I want to try and do sometimes. Thanks.
ReplyDeleteMarlies
Oh wow Margaret, this is beyond amazing!!! You are the queen of superb book design (and masculine type projects too)… So super, super cleverly put together, - love, love, love it!!!!! The way you have photographed it with the quill and antique looking ink bottle makes it all look even more stunning. This whole project has the complete wow factor!!
ReplyDeleteSorry for my lack of visits lately, but as you may remember I was over in your lovely country and decided to have a complete blog break. Back now, so you can expect more regular visits again. I'm off to see the tutorial now....
Oh Marg, your albums are the BEST I reckon, each page and then the different folds and bits that come out and over, and the embellishing is perfect.. this is very masculine and it looks strong.. love the 'screws' on the cover, the whole thing looks amazing.. i dont know how you do it, but I love it! I hope your week is going well, it has been a stinker here today, so very hot... i do hope it doesn't last long, it is simply too hot!!
ReplyDeleteI so enjoyed your wonderful tutorial Margaret, this album is fabulous. It was such a pleasure to have you as our Guest Designer at Mini Album Makers too! Hugs, Anne xx
ReplyDeleteA wonderfully strong looking masculine album Margy. I did go and get a cuppa, so I could take my time and scroll up and down, marveling at all the different ways you added flips and folds and tucks to this magnificent little mini. Each section offers something new and I especially like the Tim Holtz words for a bit of fun. So glad you are energized to create another one now and I look forward to seeing it.
ReplyDeleteOh gosh - this is amazing! Unlike Helen Wallace, I didn't go and get a cuppa but I enjoyed it just the same - lol! Fantastic work!
ReplyDeleteHello Marg~
ReplyDeleteThis album is awesome!! (thought I'd commented earlier but it must not have gone thru)
Your inking is the most amazing ever : ) Just love the quality and style you put into this book. Excellent papers and so many clever details; impeccably done. I believe you could write a book on album-making~ Thank you for sharing this treasure with us! Hugs, karen o
meraviglioso *_*
ReplyDeleteGreat project Margaret, beautifully executed. Hugs, Angela xXx
ReplyDelete