Hi there everyone!! Hope you are having a spectacular day!!
Well, as promised, I am back to share the second and final part of my step by step tutorial for the little photo folio I made for some gorgeous friends of mine. I had planned to post this by the end of last week but, you know what they say about the best laid plans of mice and men?? Well, I'm not a mouse and certainly not a man , but mine didn't just go awry, they ran out the door screaming!!!! Between problems with Blogger, feeling ill, losing our electricity for almost a day then losing our internet for another day .. life definitely did not go to plan!! Anyways, I am finally here to share this tutorial. If you haven't seen Part 1, and you would like to, HERE is where you can find it.
Hope you're all set for another Mega post!!
So this part is about making the cover and putting the folio together.

As I explained in Part 1, for the cover you will need 1 sheet of A3 size cardstock. It can, of course, be made with 12 x 12 sheets but, with the A3 size, it can be made in one piece.
The Cover
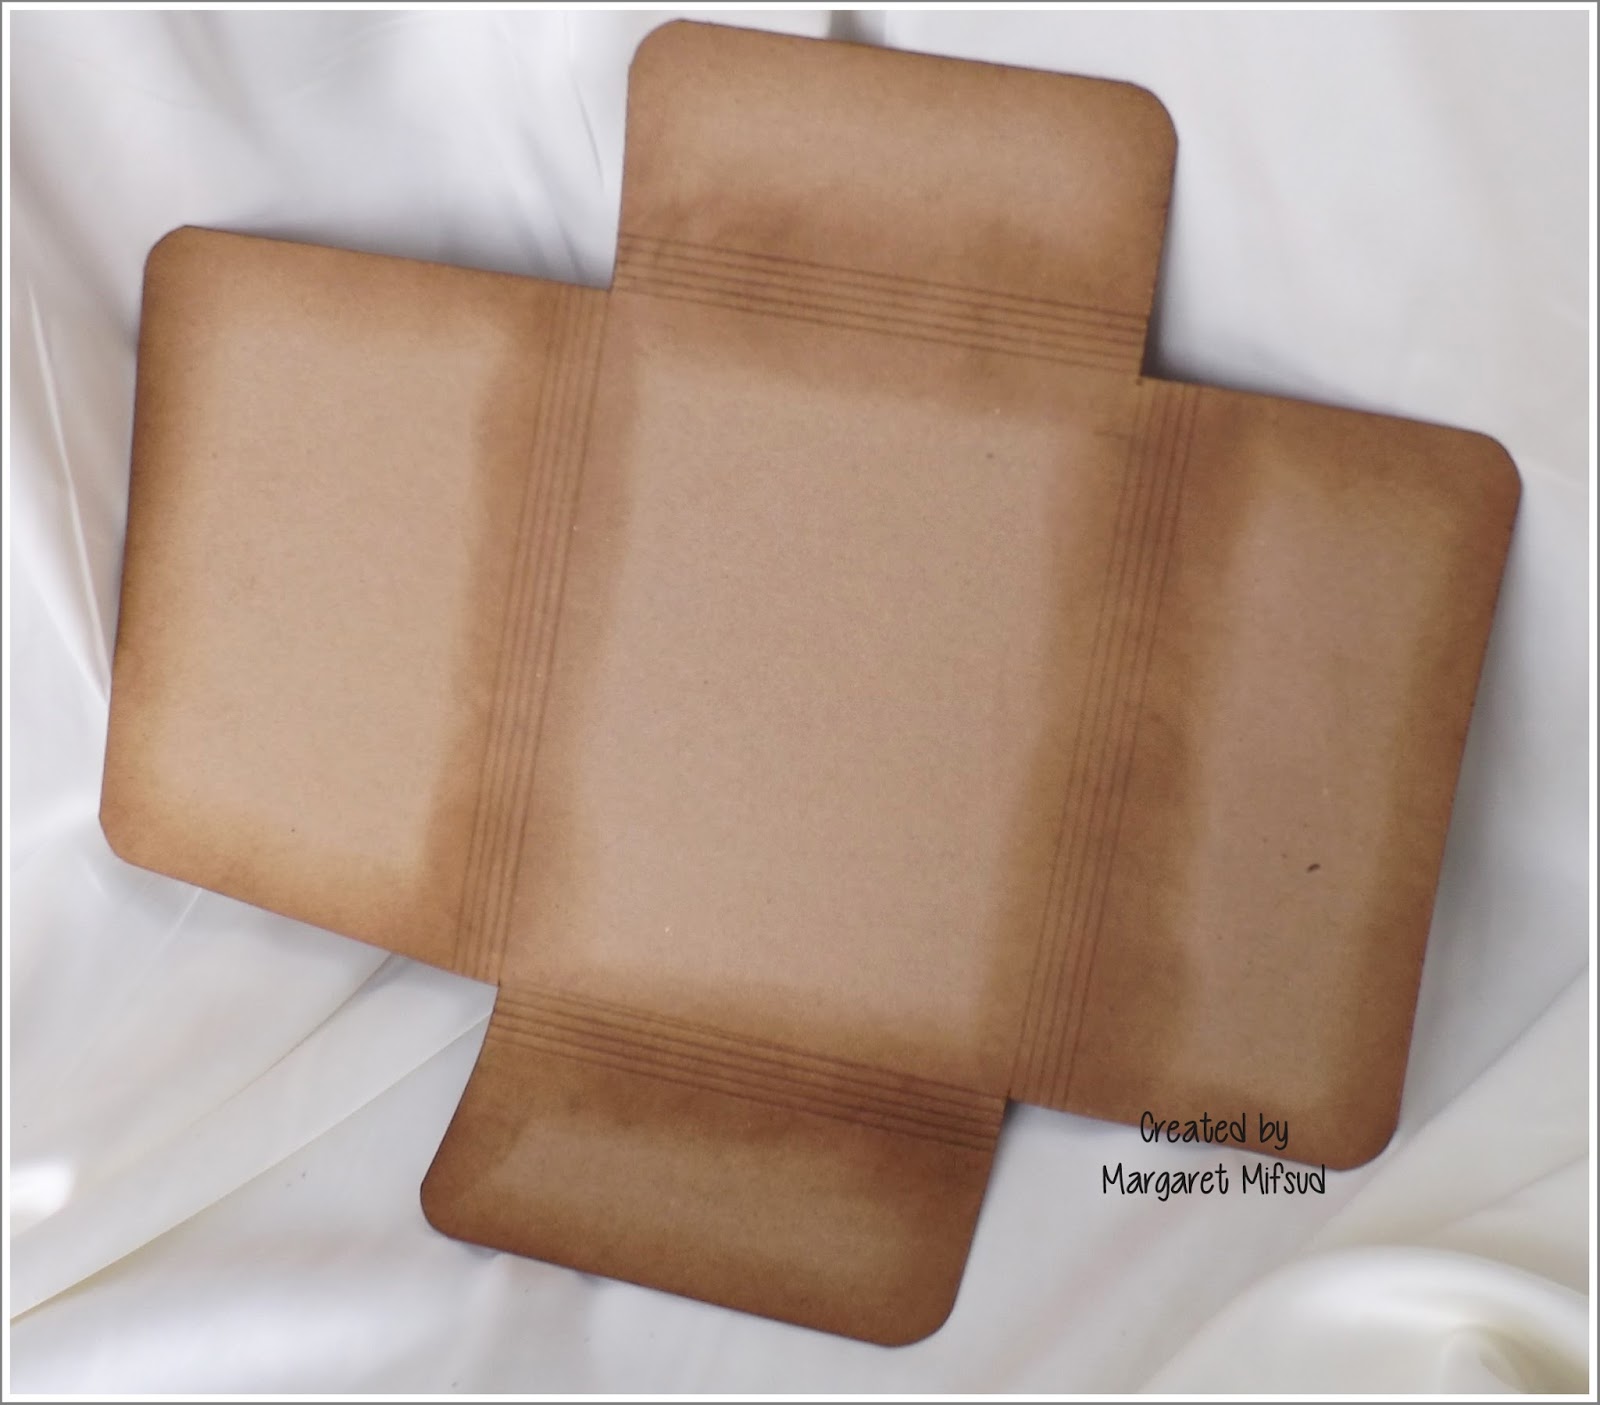
Following the diagram, cut the cover from your chosen cardstock.
Solid lines are cut lines and broken lines are score lines.
Note: If you are using 12 x 12 cardstock simply cut the smaller sized side flap separately. Just remember to add an extra 3/4inch to the side edge (making it 4 1/8" x 6 3/4") so you can adhere it to the cover.
I should explain too, that the top and bottom flaps are not as long as the ones in my previous folios. These don't actually meet in the middle as the other ones did, but I felt that wasn't really necessary anyway because they are only there to make the outside look neat when the book is closed.

Score 5 lines where shown on the diagram, 1/8" apart.

Lightly bend the cardstock on the score lines. Don't crease them, they just need to be able to curve around the inside page set.
Round the corners and ink the edges if desired.

Now the page set needs to be attached to the cover but, before doing this, we need to attach the closure.
If you have an elastic strap similar to the one used on the Tim Holtz Collection Folios (one with the small toggles at the ends which locks it into the book) then, obviously you can use that. After you have covered the book with your chosen papers you can simply punch the holes through and insert the strap. Unfortunately, I wasn't able to lay my hands on one of these so I had to make up my own version.
Attaching the Closure

As indicated on the diagram ( X marks the spot! LOL!!) Place your ruler about 1/2" below the scored lines at the top, then find and mark the center. Do the same at the bottom.
Turn the cover so that the smaller flap sits at the top. Place your ruler about 1/2" below the scored lines, find the center and make a mark 1/2" on both sides.

Punch holes where you made the marks. This is where the elastic closure will go through.

On the previous folios I made, I added eyelets where the holes were punched and then simply glued my paper over the top leaving a hole over the eyelet, which didn't look as neat as I would have liked. This time, I actually managed to glue the paper down first and then added the eyelets but, it's not as easy as it sounds because of the way I have to add the elastic. Are you confused?? Not surprised. All this is really quite easy to do, just a little difficult to explain. Hopefully, if you take it one step at a time, you will see what I mean.
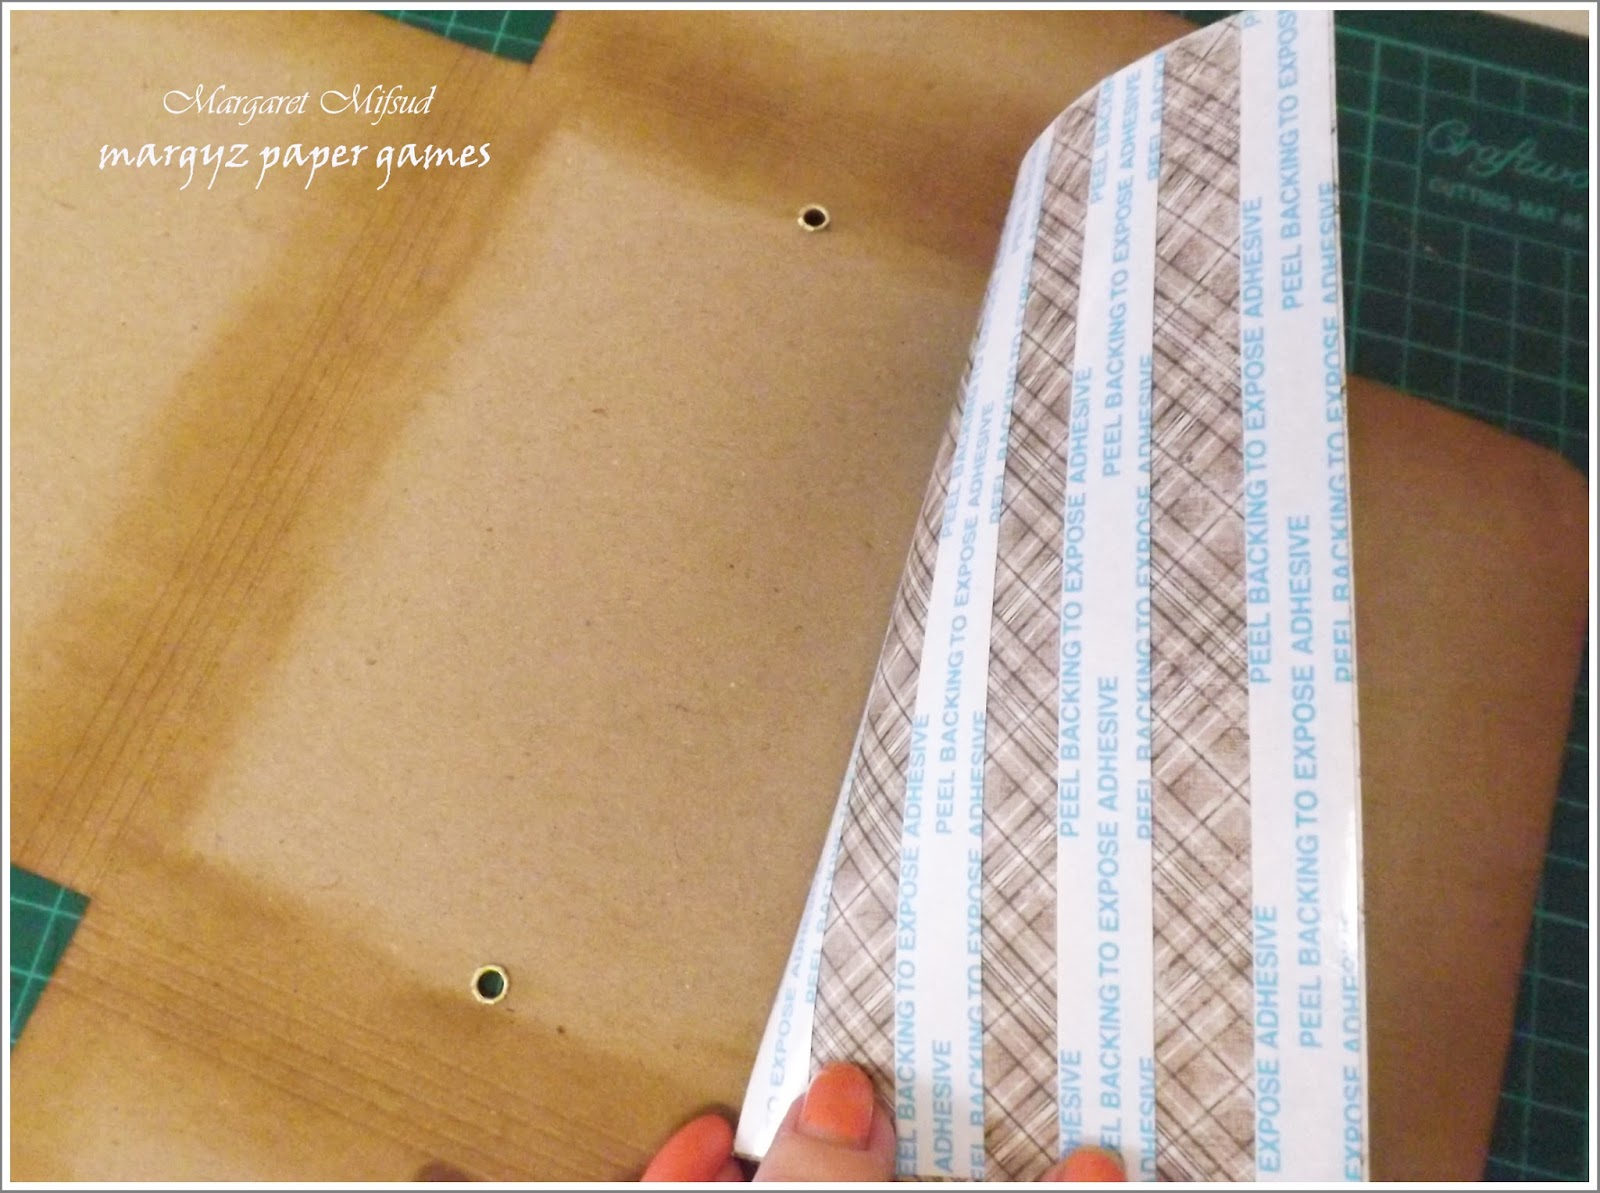
Anyway, chose the paper you wish to add to the center section of the inside of the cover and cut a piece 41/4" x 61/4" (this will actually end up glued down over the top of the base of your page set). Ink the edges and cover the back with double sided tape. Place it about 1/8" from the score lines on the right side of the center section of your cover but only remove the backing of one line of tape. You need to adhere the right side only, making sure it covers the holes made previously. You will then need to re-punch those holes out from the back, using the ones already made in the cover as a guide.


You will now need to punch out all four holes through that paper on the outside of the cover. Turn the cover over again so the inside is facing you. Re-punch through the hole at the top and at the bottom, while holding the inner lining out of the way. You can then re-punch the holes at the side through all of the layers.


.. and this is how it looks from the inside.


To make sure it doesn't slide around too much, put down a line of glue and stick the elastic to the cover.

I also added some sticky tape for extra strength.


Before adhering the page set down just check that it fits comfortably underneath the inside liner. Slide the base page under the liner .. the left hand side should sit about 1/8" from the score lines on the left and your liner should sit flat over the top of the page set. If you cannot push the set in far enough or, if your liner is slightly buckled, simply trim a piece off the edge of the base page.

When you are happy with the fit, pull the page set out again, remove the backing from one line of tape only at the loose edge of the base page and then carefully slide it back underneath the liner until it is positioned properly and stick it down.

When you're happy with its position, remove the backing from the rest of the tape lines except for the last one on the other edge (by the sew line) as shown below. Adhere the page set to the cover.


As this edge takes the brunt of the action when opening and closing the pages of the book I think it's a good idea to add a line of glue under the double sided tape for extra strength.


.. and stick it down. There will be a slight bulge underneath from the elastic, but it's not really enough to be a hindrance.

So this part is about making the cover and putting the folio together.

As I explained in Part 1, for the cover you will need 1 sheet of A3 size cardstock. It can, of course, be made with 12 x 12 sheets but, with the A3 size, it can be made in one piece.
The Cover
Following the diagram, cut the cover from your chosen cardstock.
Solid lines are cut lines and broken lines are score lines.
Note: If you are using 12 x 12 cardstock simply cut the smaller sized side flap separately. Just remember to add an extra 3/4inch to the side edge (making it 4 1/8" x 6 3/4") so you can adhere it to the cover.
I should explain too, that the top and bottom flaps are not as long as the ones in my previous folios. These don't actually meet in the middle as the other ones did, but I felt that wasn't really necessary anyway because they are only there to make the outside look neat when the book is closed.

Score 5 lines where shown on the diagram, 1/8" apart.

Lightly bend the cardstock on the score lines. Don't crease them, they just need to be able to curve around the inside page set.
Round the corners and ink the edges if desired.
Now the page set needs to be attached to the cover but, before doing this, we need to attach the closure.
If you have an elastic strap similar to the one used on the Tim Holtz Collection Folios (one with the small toggles at the ends which locks it into the book) then, obviously you can use that. After you have covered the book with your chosen papers you can simply punch the holes through and insert the strap. Unfortunately, I wasn't able to lay my hands on one of these so I had to make up my own version.
Attaching the Closure

As indicated on the diagram ( X marks the spot! LOL!!) Place your ruler about 1/2" below the scored lines at the top, then find and mark the center. Do the same at the bottom.
Turn the cover so that the smaller flap sits at the top. Place your ruler about 1/2" below the scored lines, find the center and make a mark 1/2" on both sides.

Punch holes where you made the marks. This is where the elastic closure will go through.

Anyway, chose the paper you wish to add to the center section of the inside of the cover and cut a piece 41/4" x 61/4" (this will actually end up glued down over the top of the base of your page set). Ink the edges and cover the back with double sided tape. Place it about 1/8" from the score lines on the right side of the center section of your cover but only remove the backing of one line of tape. You need to adhere the right side only, making sure it covers the holes made previously. You will then need to re-punch those holes out from the back, using the ones already made in the cover as a guide.

Do not remove the rest of the backing on your double sided tape as yet.

Turn the cover over and adhere your chosen paper to the center section. This is the back of the book.

You will now need to punch out all four holes through that paper on the outside of the cover. Turn the cover over again so the inside is facing you. Re-punch through the hole at the top and at the bottom, while holding the inner lining out of the way. You can then re-punch the holes at the side through all of the layers.

From the back of the cover, add eyelets to the side holes through both designer papers. Then add eyelets to the holes at the top and bottom but make sure you do NOT go through the liner on the inside.
Here is how it looks from the outside ..

.. and this is how it looks from the inside.

Hope this is making sense so far.
Cut a 16" piece of your chosen elastic (I used hat elastic .. the thin round type) and thread it through the eyelets as shown ..

.. the ends will sit underneath your inside liner.

As I couldn't find the toggles which lock the ends of the elastic into the book, I decided to sew the ends together.

To make sure it doesn't slide around too much, put down a line of glue and stick the elastic to the cover.

I also added some sticky tape for extra strength.

Now we're ready to put this book together.
Attaching the Page Set
Attach double sided tape to the back of the base page on your page set.

Before adhering the page set down just check that it fits comfortably underneath the inside liner. Slide the base page under the liner .. the left hand side should sit about 1/8" from the score lines on the left and your liner should sit flat over the top of the page set. If you cannot push the set in far enough or, if your liner is slightly buckled, simply trim a piece off the edge of the base page.

When you are happy with the fit, pull the page set out again, remove the backing from one line of tape only at the loose edge of the base page and then carefully slide it back underneath the liner until it is positioned properly and stick it down.

When you're happy with its position, remove the backing from the rest of the tape lines except for the last one on the other edge (by the sew line) as shown below. Adhere the page set to the cover.


As this edge takes the brunt of the action when opening and closing the pages of the book I think it's a good idea to add a line of glue under the double sided tape for extra strength.


You can now remove the backing from the double sided tape on the inside liner ..

.. and stick it down. There will be a slight bulge underneath from the elastic, but it's not really enough to be a hindrance.

Yayyyy!!
Your book is now put together and the only thing left to do is create a pocket on the inside front cover, cover it all with your chosen papers and create the photo and journaling mats.
Inside Front Pocket
Following the diagram cut 1 piece from your chosen cardstock.

Score 3/4" from the edge on three sides as indicated on the diagram.

Crease on the score lines, ink the edges and cut off the bottom corner pieces as shown.

Make sure when you fold the edges of the pocket in that the corners will sit flat.

If you have rounded the corners of your cover, you will need to round off the bottom left side corner of your pocket as well.

Attach double sided tape to the scored sections and adhere your pocket to the inside front cover.

Now, all that is left to do is create the photo and journaling mats.
I haven't drawn diagrams for these .. I will just give you the dimensions.

The photo mat for the inside front cover .. cut one - 4" x 6"
The photo mat for the full pocket page .. cut one - 3.5" x 6"
The journal mats for the double pocket page .. cut two - 4" x 2.75"
The folded card which sits inside the half pocket page ..

Cut one - 6.5" x 6"
Score at 3.25" and fold it in half.

Woo!! Hoo!! It is done!!!!!
You can now finish covering everything with your chosen papers.
I really, really hope this was easy for you to understand. Putting this book together may seem rather complicated but, when you are actually doing it and taking it one step at a time, you will find it is really quite simple. One thing I should tell you, due to it's construction, the pages do not sit flat when the book is open .. they actually pop up slightly but it is quite neat and flat when closed.
So, this book is now complete. Right at the very beginning of this saga, when I shared the books made for my friends, I said that I hadn't as yet made my own. Well, I still haven't yet made my own. The book I made while writing this tutorial is also going to a friend. She said she really liked it so I hope she wasn't just being kind because she is now getting one as well. I will actually share piccies of it in the next couple of days ... Oh dear, perhaps I should not have said that considering what happened last time!!!! LOL!!
I am in the process of making another one, and that is definitely going to be mine! (I think .. LOL!!)
Thank you so much for sticking with me through these huge posts and a special thanks to those of you who left me such lovely comments. I really do appreciate your kindness and support.
If any of you end up using these instructions to make your own folio, and you have any problems at all, please just contact me and I will try to clear them up. Also, please let me know if you've made one and send me a link .. I would love to see it!!
Thank you so much for visiting and have a great day!!
Take care and God Bless.

Hi Margaret. Thank you so much for these wonderful diagrams and putting this tutorial together for us. It must have taken ages to do and I cannot wait to get started. Will let you know when it's finished. Hugs Rita xxxx
ReplyDeleteMy goodness Margaret you've worked incredibly hard to put this two part tutorial together and I'm incredibly grateful - LOVE it all! Thank you so much for sharing. I've bookmarked both posts so I can keep referring back to them. Now where have I put that immense paper stash that needs using... Jenny xx
ReplyDeleteWhile I am so sorry you had to deal with all that last week, I'm actually quite glad you didn't get around to posting this until now, as I had a mad week myself, and might have missed it otherwise! Thank you so much for this fantastic tutorial. I LOVE it! x
ReplyDeleteOh Margaret, you truly are a star!!! What an unbelievable tutorial, thank you so, so much!! I cannot wait to start, though I am slightly apprehensive whether I can actually make it look even half as neat and well done as yours.... I so appreciate all the time you must have spent on this!! My A3 card has arrived, now I just need to get the elastic and actually find the time to do it.... Anyway, sorry to hear of all your mishaps, glad it is sorted now and hope you are feeling a whole lot better too again... Sending HUGE hugs! xxxx
ReplyDeleteI just started to do a little mini for Lucas for 2015 [I do one each year for the Grand Boys - usually those left over photos I haven't got to scrapping!] & you should've seen me trying to work out how to make the sizes slightly larger.....then I was trying to figure out how it would sit in the 'skin' - cos this was on the weekend....then I threw my hands in the air, sliced some papers into 8x6, got out the sewing machine, whacked a stitching down the middle & chucked on some parcel tape for strength. I am a FAILURE!!!!!! Aaaah well. I'm going to print both of your tutorials off, cos now I've seen part 2, part 1 makes much more sense. And I WILL do one of these one day! I think they look soooo professional. Wish I could be as precise....& that idea with the eyelets is FAB, too:) AND [finally!]. YES! One for you would be waaay nice. And [finally, finally, LOL]... hope you're feeling MUCH better & modern technology doesn't desert you in a hurry for a long while!!!
ReplyDeleteOh I can totally relate to how your week went, the days just seem to fly by whether one is organized or not!!! but you had quite an adventure last week didnt you!!?? These instructions are incrediable.. the end result is amazing.. what unique and precious little books and I commend you on creating them and sharing the instructions too...They would be good for any occasion for a special keepsake... I hope you have a better week this week!!
ReplyDeleteThank you for the tutorial Margaret. Your instructions are very clear and lots of photo's to go. This will have cost you lots of time. Making a mini is still something on my "to Do"
ReplyDeletelist and one day I hope to get round to it. hugs, Marlies
wow, these are amazing, I am going to have to try one for myself. Thank you so much for all the work you did into posting this!
ReplyDeleteThank u so much Margaret for this amazing tutorial....this beauty is surely the result of your hard work and passion...love this :)
ReplyDeleteOh dear, what a stinker of a week you had - I hope that's all over and done with and you can now enjoy a brief glimpse of spring. You are the Queen of the neat people to be able to get all those layers looking so perfectly straight. Your step by step instructions must have taken hours and they explain succinctly exactly what has to happen. I've purchased my A3 card and now need to find the time to emulate your beautiful work. Will let you know how I get on. Thanks for your generosity :D
ReplyDeletehehehehehehe ok so I have seen a few posts today and I am pretty sure that on one of these I have commented twice... I have been back and forth a few times poring over the details and how to make these little books. I JUST LOVE THEM <3 Thank you so much for so generously sharing <3
ReplyDeleteThankyou for your explanation. I'm going to give it a try!
ReplyDeleteYour journal looks amazing! Thanks for inspiring me.
Greetings from The Netherlands, Anneke
Thank you! So lovely.
ReplyDelete