Saturday, 10 November 2012

Completed Curiosity Shoppe Mini Album

Hello all!  My Mini Album is finished. Yayy!!  I had a lot of fun doing this one.  Sorting out the binding and working out how to do the faux leather and then all the different pages.  I really enjoyed the process.  I loved working with the Graphic 45 Olde Curiosity Shoppe papers, they are so versatile and I love all the images on them that you can fussy cut.

I created quite a few pockets for tags and for single page booklets so there are plenty of spaces for photos  and also for journalling. 

I did a lot of fussy cutting and I enhanced some of the images with glossy accents.  Unfortunately the camera doesn't really pick that up.


The envelope opens up and swings out from the page, it is held down with a magnet.


This pocket flips out with more photo space behind it.


Here, if you look closely, you can see where I've used the glossy accents.
 
And this is the back.

So, that's my Curiosity Shoppe Mini Album.  If you've checked out some of my previous posts you'll see that I've explained how I did the binding.  I wasn't entirely sure if it would be sturdy enough.  Well, I can now tell you that it is quite strong.  This mini has been looked at by quite a few people now and it hasn't fallen apart, thank goodness.

Thank you so much for stopping by.  Have a lovely day.  Take care and God Bless.
xoxo Marg

Wednesday, 7 November 2012

Curiosity Shoppe Mini Album Cover

Hi everybody! I've almost finished my Curiosity Shoppe Mini Album.  Having a little trouble with this one because I keep coming up with different ideas.  Anyway it's nearly done, I've just got a few more tags to make.  I thought I'd share with you how I made the cover.


I originally wanted faux leather, so I researched the net and found a few different methods for making cardstock look like leather.  The one I tried  uses Ink Refresher.  You saturate the cardstock on both sides with the refresher and then scrunch it up, open it out, scrunch it up again and do this until you get the look you want.
Be careful though with the type of cardstock you use. I tried it on a small piece first and it worked really well but when I worked on the piece for the cover I used a different cardstock and ended up with black hands because the colour ran. I had to put on rubber gloves. 
After I got it to the look I wanted I sprayed it all over with Creme de Cocoa Glimmer Mist and then in a few spots I also used Sugar Plum Fairy.  After it was completely dry I rubbed some Versa Color Bronze over the raised bits.
 
Not sure that it actually looks like leather but it didn't turn out too bad.  Unfortunately it was a bit difficult to make it fit around the edge and I couldn't get it to stick down properly.  In the end, I made a frame and only used the leather look piece in the centre. 
The clock charm and the leaf are from Blue Moon and the brad is from Graphic 45.


Here is a close-up of the flower cluster.  Some are Prima and some are Kaisercraft. The leaves were cut with Magnolia Ink's Vintage Flower & Leaf Die and I added a few of my little spirals as well.


And this is the back.
Further to my previous posts on the binding for this album, before I add the outer cover I glue some cloth tape just on the spine only.

Like this.
I think it helps to strengthen it.  Unfortunately my albums don't open up as wide as I'd like them to so I'm going to have to find an alternative for the outer spine cover.
Well my friends, that's all for now.  Enjoy the rest of your day and thank you so much for visiting.
Take care and God Bless
xx Marg

Friday, 2 November 2012

New Card

Hello everyone!  I have a card to show you.
A friend had a birthday this week and I had to leave my Mini Album and concentrate on her card. I've actually had to work on a few cards because my son's birthday and anniversary are coming up soon as well but I won't be able to show you those yet.  Didn't like leaving the mini but it's all in a good cause. 
Anyway, I decided to make a spring card for my friend, haven't made one of those for a while.

I double matted it and used some paper from Graphic 45's Olde Curiosity Shoppe on the base. The paper I've used on the main section is from my stash and I really can't remember where it came from.
 
The large pinkish flower I made myself following one of Natasha's tutorials (you can find it HERE). The gold flower is from Prima and the tiny ones are from Kaisercraft.  The mesh like material  was actually part of a flower from a fascinator kit.  I pulled it apart, scrunched it up and used it for a bit more dimension. The gem spray I put together myself and the swirl was cut with Magnolia Ink's Hearts Swirl Die.

I inked the little Imaginarium frame with Walnut Stain Distress Ink and then covered it with Crackle  Accents.  When it was dry I went over it again with the Walnut Stain hoping to bring out the cracks a bit more but being such a small frame they are a bit hard to see.

On the back I simply glued down a Kaisercraft die-cut to make a pocket

and then cut out a scalloped oval from Prima's Rondelle papers to make a tag for the sentiment.

I won't actually know if my friend likes it or not because she's away in Bali (lucky thing).  Knew she was going but didn't realize she'd be away for her Birthday.  So I guess I'll have to be patient until she comes back.

That's all for now. Thank you for visiting.
Please take care and God Bless.
xx Margy

Thursday, 25 October 2012

Olde Curiosity Shoppe Mini Album

Hi Everyone!  Thought I'd give you an update on the Mini I'm working on.  It's made with Graphic 45's Olde Curiosity Shoppe papers and I'm using the binding system as explained in my last post.  So far it is working well but I did have to change it slightly because I didn't like how it looked. My original idea was to use a couple of small hinges to create the cavity for attaching the pages to the spine  of the book, but I didn't like the fact that in some instances the hinge was actually visible.  So I decided to attach a strip of cardboard over the hinges before adding the paper. 

    Like this.

And here is the result. As you can see on the right hand page, the hinge is visible but on the left hand side I've used the new version and it does, to me, look better.
  The book is not finished yet but here are a few pages that are complete.
As is my usual practice, this mini will have lots of tags. 

And I've done a bit of fussy cutting.


As I said, the book is not quite finished but I'll show the rest when it's done.

These photos were taken with a new camera I'm trying for the fist time.  It actually belongs to my youngest son who is allowing me to have the use of it.  I love it. It is so much easier to get close-ups and I didn't have to delete half the photos I took.  Thanks Rod, you're the best.

That's it for now. Thank you for visiting.  Take care and God Bless.


Saturday, 20 October 2012

Binding for Mini Album

Hello everyone!  I am in the process of making another Mini Album.  Surprise! Surprise!  I think I may be addicted.  Anyway, I am using a combination of Kathy Orta's Hidden Hinge Binding (you can find it HERE) and Annespapercreations page construction from her Ladies Diary Yearbook Journal (you can find that HERE).  I love Kathy Orta's Mini Albums, she is a very talented lady, but because I like to use cardstock instead of envelopes or paper bags, I find I go through a lot of cardstock and the pages come out really thick.  Then I stumbled upon Annespapercreations (also a very talented lady)  and loved the way she constructs her pockets with hinges instead of folding over the cardstock, so I came up with my own interpretation.  Someone may have come up with this method before but I myself haven't seen it anywhere.


This is the hidden hinge system from Kathy Orta which I am using as the base for my Album.
 
 This is just a closer view.

 Here is the base card for one of the pages. You can see I've created two little hinges on the edge that goes on the inside of the Album.


When you glue the paper down on the side with the hinge you have to make sure you leave it open for the depth of that hinge but you do need to glue the paper to the actual hinge.  On the other side you can glue the paper down completely. So you will have a page with a cavity of about half an inch down one side.
 
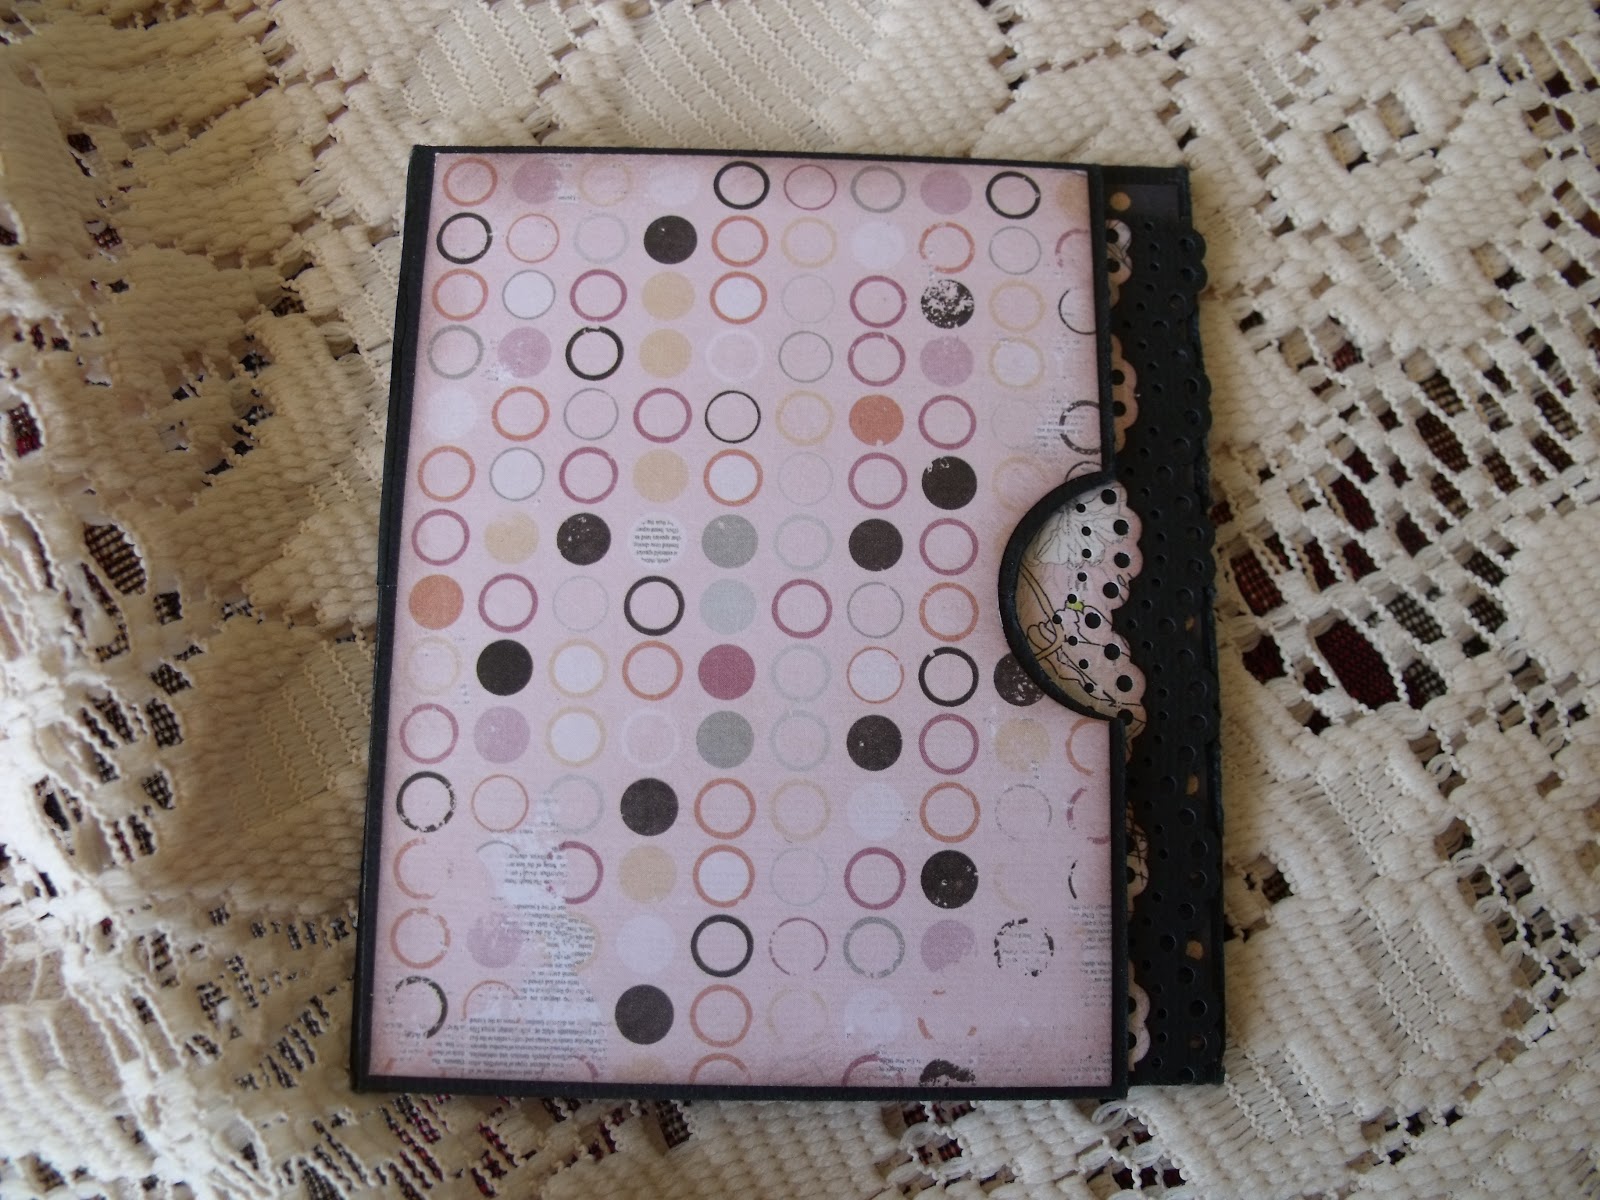
 This page has the hinge side of the cardstock so for about half an inch on the left hand side the paper was left unglued.  The pocket was constructed out of cardstock following Anne's hinge method and then of course covered  with paper as well.
 This is the other side of the page and I was able to glue the paper down completely.  This pocket  was also constructed using Anne's method and just the hinges attaching it to the page are of cardstock. 
  And here is the page attached to the binding.  You simply remove the score tape from both sides of the long hinge and slip the cavity over the top and make sure you push it all the way to the base to stick it down.  Exactly the same as Kathy explains it in her tutorial. (If you trim a small triangular piece from the each end of each mountain fold you will find it easier to slide the cavity onto it.)
 
This is the other side of the page attached to the binding.

I hope these instructions make sense and that someone finds them useful. I 'm finding it better for myself because it uses a lot less cardstock and I think it will be strong enough because it really isn't all that different.  You couldn't use just normal paper but designer papers are generally quite heavy anyway so I believe this will work quite well.  I'll show the album when I'm finished and by then I should have some idea if it is going to be durable or not.
Thank you for visiting. Take care and God Bless.  xx Margy


Sunday, 14 October 2012

Mini Pocket Page

I wanted to show you the mini pocket page booklet I made using a tutorial by Kathy Orta. If you would like to take a look you can find it  HERE. It is really simple to make and it is really cute.  You could make it any size that you want and it could be a little brag book for your purse as well.


 This is the first half of the booklet. It has a pocket with a tag as shown below.
 
  This tag could actually be a folded one so you would have more photo space.
You open it up and there are 2 photo mats inside.
 
Flip it over to the back it looks like a small envelope.  Open it and you'll find more photo mats.
 
 
 This is how it looks on the edge.
And here is the other half of the pocket page.  I actually cut it into two because it was too thick to fit into the pockets of my mini album.  

 This is the front,
 the back
 and the inside.

This really is an ingenious design.  It only uses one sheet of cardstock and is not large (about 31/2" x 4") but it has quite a lot of places for photos and you could make it really pretty with embellishments, etc.
I'll have to make my next Mini a little larger because I want to make more of these and I'd like to keep them in one piece.
 A great big Thank You to Kathy Orta for designing and sharing her wonderful creations with the rest of us.
That's all for now. Thank you for visiting my blog. Take care and God Bless.
xx Margy