Showing posts with label off the page. Show all posts

Monday, 20 July 2020

Work Trays & Stations

Hello everyone and welcome to my blog. 
Gosh, it's been ages since I posted anything here so I thought it was time I showed you some of what I've been doing.
I have been watching a lot of videos lately.  Crafty ones of course.  Well, mostly crafty ones.  One lady I have been watching a lot is Jennifer Harrison of JenofEve Designs.  She has a lot of videos on different styles of mini albums and items related to them which can also be used in other types of crafting.  One of her ideas which appealed to me is the use of work trays.  I was already using plastic trays  to store some of my stash, but Jennifer used hers to hold the things she was using in the particular project she was working on.  I really liked this idea, mainly because I am always losing things amongst the mess on my craft table.  I know, I should tidy it up after each project but, unfortunately, that very rarely happens.
Anyway, although I haven't used Jen's templates, I decided I would create some work trays of my own.  
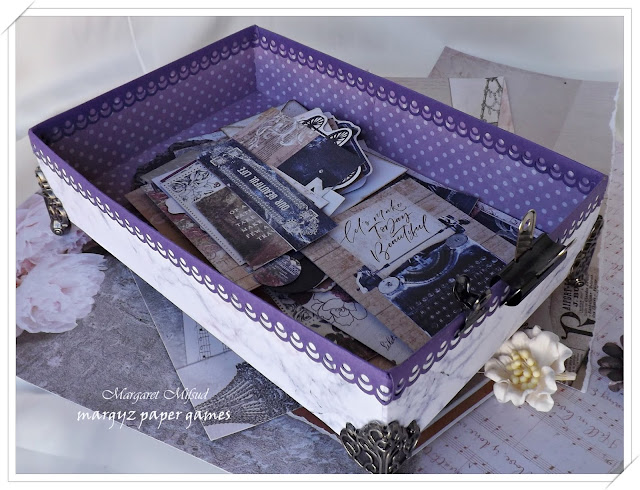
  This was a tray I already had made up.  I simply covered and lined it with new papers and edged it with cardstock.  The papers are from Kaisercraft's Misty Mountains Collection.
Found the feet in my stash.  I think they were purchased at a Craft Fair a few years ago and never used.  They certainly came in handy and I need to find some more.  I used Martha Stewart's Doily Lace Edge Punch for the trim.
The larger tray was made from a Cereal Box.  I simple cut off the front, reinforced the corners and then lined and covered it with papers from the same collection as above.   At the moment it's full of journal cards and ephemera I am using for a little album I am making.  So handy having them in the one place instead of spread all over my desk.
Pretty sure the feet on this one are by Tim Holtz.  I actually rescued them from another box which was heading for the bin.  The trim was punched out with Martha Stewart's Optic Dot Edge Punch.
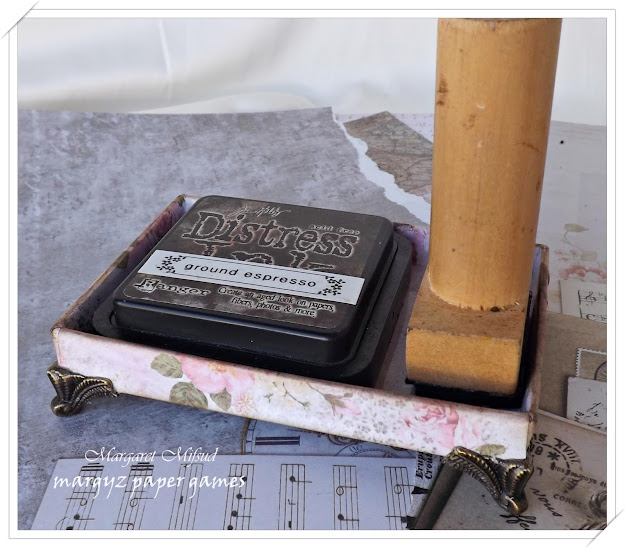
As well as the work trays, I made a couple of work stations.  You may be wondering what's the difference between Trays and Stations.  Well, the trays can be used for different things.  Different projects, different stuff.  The Stations, on the other hand, always have the same purpose.  So, this Ink Station will always be used to hold an ink pad and applicator.  The one at the back actually sits permanently on my desk.  Now my ink pad won't ever get lost amongst the mess.
The papers used to cover these are digitals.  The floral is from ArtyMaze, (the link will take you to the video where she shows the kit.  If you wish to get the kit, please subscribe to her channel as this is a freebie for her subscribers) the collage paper I have had for ages and have no idea where I got it from.  Both are really pretty.
You can't really see it in these photos but I have placed a piece of acetate in the bottom of the station so it's easier to keep it clean.
This is the one I use all the time and you can see how dirty it does get from the applicator.  Having the acetate in the bottom means I can simply wipe it clean with a damp cloth.

I also created a glue station.  One to hold double sided tape and a few wet glues as well.  Again, I've used the floral paper by Artymaze.
Unfortunately I had no metal feet left for this station but, I had recently watched a video by Vectoria Designs showing how to make these little feet from cardstock and that is what I used here.  Really easy to make but, instead of using brads, I used a few sticky back gems.  (Yes.  You guessed right. I forgot to add the brads before glueing them onto the corners.  Duh!!)
Double sided tape in the back and wet glues in the front.  Perfect.  This one is also permanently sitting on my desk.
I've been using these for a few weeks now and I am really happy with them all.  Now I don't have to worry about losing my glues and ink pads no matter how messy my work desk gets.

On a different note .. I have just written this post with the new blogger.  This is the first time I have actually gotten all the way through without having to revert back to legacy because it was too hard to work out.  They have obviously been listening to all the complaints and have made some changes.  I can't say I love it but at least it was do-able.

Thank you so much for stopping by.  I must aplogise for not visiting much lately.  Life has been a bit topsy turvy for a while but, I am hoping, that is sorting itself out now.

Have a wonderful week and do enjoy your crafting.
Take care and God Bless.


Tuesday, 10 September 2013

A Craft Caddy

Hello everybody!!  Hope you are having a wonderful day and I'm so glad you came to visit.

I wanted to give you a quick look at another box I'm making.  This is going to be my new craft caddy to hold tools and tapes and glue, etc.  This caddy is based on Kaisercraft's Desk Caddy but I've altered the design slightly to suit my needs.
Here is the sketch I made of the design and the measurements.  Rather amateurish I know but, luckily I'm the only one who needed to make sense of it.  hehe!!

 
I've used pasteboard for this project which is very similar to chipboard but you really could use any type of board you like as long as it's strong enough. 
The pictures below show all the measurements for the individual pieces.


In a previous post I showed how to make the joiners used to glue these pieces together.  You can find that post HERE
 I drew lines on the base where the dividers needed to go so I would have a guide to get them in straight and then I placed a joiner on each side.
Here you can see where I've placed the joiners on each side piece and also the other guide lines for the dividers.  When attaching the sides to the base you need to leave a small gap of about 1/16" so that there is room for them to sit upright.
 On the dividers I glued a joiner on both sides of the piece so that the joint would have more strength.

One divider for the length of the box ...
and two of each of these for the width.

Here you can see how I attached the main divider onto the base ... 

and then I attached the sides of the box to the divider ...


 but then I got so caught up in the moment that I forgot to take pictures of my progress so all I can now show you is the finished box.
TA! DAH!
If anyone is interested in making one of these and you have any questions, please just leave a comment and I'll answer as best I can.

This is still a work in progress.  In my next post I'll show you the finished product.  Hopefully that won't take me too long, I'm looking forward to using it for my craft tools.

Thank you so much for taking the time to visit.
Please take care and God Bless.
oxox Marg

Sunday, 18 August 2013

Off the page

Hello everyone and a warm welcome to my blog.  I hope the weather is better wherever you are because Adelaide is miserable at the moment.  Lots of rain and very cold, well, cold for here anyway.
I have a tidy box I'd like to share with you.  It has taken me a few weeks to make this because I started from scratch.  The box is made from pasteboard and I've used my little joining strips to put it together.  My own design and everything!!  Yeah, I know, you're saying to yourself  'Sooooo? Big deal!'  Well for me it is a bit of a big deal,  I've never made anything this big before and, luckily, I'm quite pleased with the result.

 My reason for making this box is to hold remote controls and the bits and pieces my hubby and I have sitting beside us when we're watching TV.  We had a little basket before and it was kinda overflowing.
 
 Having never done this before, I made quite a few mistakes and had to fudge a few things but, hopefully, they don't show.
 The papers I've used to cover this are from G45's Communique Collection.  I love these papers, they are totally gorgeous and I wish I could get more but they've been discontinued for a while now  and it's getting quite hard to lay my hands on them.  I did use TCW's reversed chicken wire template and a Versa Magic  stamp pad in Midnight Black just to add a little more interest.
 The drawer pulls are from Kaisercraft.
The most time consuming bit on this box was the punched border strips I used to edge it with.  They took quite a while to make and there were so many of them!!!!!  But I must admit I love how they look.
The chippies and wooden flourishes were coloured with Shabby Shutters Distress Ink and Cyan Versa Color and then I covered them with Glossy Accents.  I saw a similar colour combination on a layout made by Heather Jacob.    She is an amazing artist and you can find her blog HERE.  I loved the colour combo so decided to try it out.  She actually used a turquoise Distress Ink (I think) instead of the Versa  Color but I didn't have that and she also used a clear crackle on hers but I decided to just use the glossy coating instead.  I love how it looks!!

The blue colour doesn't show up as well on the wooden flourishes but I still like them too.  I'm not sure where the above chippy is from but the two wooden flourishes are from Kaisercraft.  I've used the Ornate Plate and the Fancy Door Knocker.
 I've placed some vintage brads on both these flourishes.  Another idea I got from Heather.   I actually had the great pleasure of going craft shopping with her and she recommended a few things to me that I might never have bought but which I absolutely love!!  Thank you Heather, love you girl!!
 
I didn't want anything too 3 dimensional on the sides so I used some G45 and Kaisercraft tags and labels and arranged them in and around some chipboard frames.  These little frames are Little Birdie chippies and I got them from 'Cheap as Chips'.

 
This chippie is a Mini Scroll from Dusty Attic.  There is one on each side of the box coloured in the same way.

 The flowers are a mix of Kaisercraft, Prima and Magnolia Ink and I made them into a vine so that they could more easily be spread across the front.  


 I used Matisse Gel Medium to glue all the papers down and the edges were inked with Walnut Stain Distress Ink ... and here is the box on the coffee table  and in use.  Puzzle books, remote controls, pens, pencils and all sorts of other bits and pieces all neat and tidy and there's room for more!! 

 I hope you like my coffee table tidy box.  It took a while to do but I really enjoyed making it, although, if I ever have to make another, I'll have a better idea of how to go about it because of all the mistakes I made with this one.  hehe!!

Thank you so much for visiting.  I do hope you enjoy the remainder of your day.
Take care and God Bless.
oxox Marg

Sunday, 16 June 2013

Box to Hold a Mini Album and Smash Book

Hello everyone and welcome to my blog.
I'd like to show you the box I constructed to hold a travel mini and a smash book I'm putting together to hold photos and mementos from our New Zealand Cruise.
I got the idea for the box from Astrid MacLean at Astrid's Artistic Efforts.   You can find her blog HERE.  She has lots of wonderful creations to inspire you.
 
I constructed the box from 2ml thick card which I purchased from my Newsagent.  It's much like chipboard but it's covered with white paper and it's quite cheap.  You can get a huge sheet of it for just a couple of dollars.  After putting the box together I covered it with G45 paper from their Communique collection and edged it with Walnut Stain Distress Ink.  I love this paper, the colours are so gorgeous and it has so much detail on it that I didn't have to do any stamping.


The vintage map and the Tikis are free images from the net.  The Tikis I printed to the size I needed, fussy cut them and mounted them on the same card that the box is made of to give them extra dimension.  The map is just mounted on a tag tied with a piece of the gorgeous ribbon I received from Sandie Edwards.  You can find her blog and more wonderful inspiration  HERE.  The  Title was cut from black cardstock using my Silhouette Portrait.


The larger flowers I used are from Kaisercraft, which were lightly edged with gesso, and the smaller roses are from Prima.  I placed them on a piece of gauze which was randomly coloured with Vintage Paper Distress Ink.  The leaves I've had in my stash for some time and the small gold spirals were made from some long stamen pieces that I found at one of our cheap outlets.


The 'Tattoo' was another free image from the net.  With the image I was able to make a cutting file for my Silhouette Portrait so it was really easy to cut out the shapes.  (I love this machine, it is so versatile.)  Once the Tattoo was glued to the box I went around it with a soft black pen to blur the edges a little.

More images from the net.  Printed to size, fussy cut, mounted on some card and edged with Walnut Stain Distress Ink.
I really enjoyed putting this box together and it was so simple.  I've also made another smaller one to hold some tags and I've taken photos along the way so I'll do a post on that shortly.

Here is the box with the Mini Album and the Smash Book inside it.
Now I really need to get serious about sorting out the photos and mementos to finish off these books.   I have started, but it's a slooow process. 

Thank you so much for visiting and have a great day.
Take care and God Bless.
oxox Marg