Saturday, 30 November 2013

My First Meg's Garden DT Project!!!

Hello everyone and welcome to my blog.  Hope you are having a wonderful day!!
I am super excited to share with you my very first DT project for Meg's Garden.
For this project I have created a card with some photo mat pages on the inside so that you could take some pictures of your Christmas celebrations and keep them in the actual card itself.
Using one of these types of cards each year, you could keep a record of Christmases through the years all in their own tiny little album.  You only need to take a few photos each time and the card wouldn't take up anywhere near as much room as a Mini Album.
I've used the Musical Christmas Collection paper pack for this card.  These papers are absolutely gorgeous and the paper pack is the perfect size for card making. 
On the front I have created a Christmas tree from some of the DP mixed with some red, white and green cardstock.  The idea for this tree actually came from one of my favourite card makers, Dorota.  She makes the most gorgeous cards.
 The tree is made using a triangle of paste board or chipboard as a base and then just layering different foliage die cuts until the base is filled.  I've also mixed in a bit of gauze here and there.  It was then lightly brushed with gold acrylic paint and I also glued on some gold crystals to serve as the lights.  The star at the top of the tree is from a sheet of gold stickers that have been in my stash for some time as are the stars  around the edge. 
The 'Noel' is part of the design on the paper. I've simply fussy cut the letters from another sheet, glued them onto some paste board and edged them with the same gold paint.
 There's not a lot of embellishment in this card simply because it would then have become too bulky and besides, these papers are pretty enough to stand on their own.  I've simply used some of Meg's beautiful lace ribbon on two of the pages and also placed a few of the gold stickers here and there.
Placed inside the main pockets are a couple of plain photo mats  which could also be used for journaling.  


  On the inside cover is a small tag which was stamped  with the sentiment, then gold embossed and another of the gold stickers was placed on the edge. 
 Two of the pages have corner pockets made out of a piece of clear acrylic that came from some pakaging  I had.  Cut them into heart shapes and placed a sticker on each of them.  They can be used to hold journaling cards or just as decoration on the edge of a photo.
Here is a close-up of one of these pockets ...
... and here is a closer view of the layers on the tree.
I had such a wonderful time creating with Meg's gorgeous papers and I am so thrilled to a part of this amazing Design Team.  Thank you so much Meg for giving me this wonderful opportunity.

Meg's Garden products used:
A Musical Christmas Paper Pack.
1.6cm White Lace Ribbon

HERE is the link to the Meg's Garden Blog so you can check out the beautiful creations of the other Team Members and HERE is the link to the shop so you can check out all the marvelous products.

Thank you so much for visiting and I hope I have inspired you to create some Christmas goodies with Meg's Garden products for yourself.

Take care and God Bless.
oxox Marg

Friday, 29 November 2013

A Birthday Card and some Happy News!!!

Hello everyone!!  A very warm welcome to my blog.
I have another card to share with you but first I'd like to anounce that I WON one of the fabulous prizes in the Pion Design giveaway!!!!!!!  Their latest paper collection is on it's way to me as I write this!!!  I am so excited and cannot wait to receive them and start creating!!  Thank you so much Pion Design!!  If you'd like to check out their blog you can find it HERE.
Now that the excitement has died down (well, mine anyway! hehe), here is my card.
My oldest son celebrated his Birthday last week and this is the card I made for him.
 The base is black cardstock and the papers are from Kaisercraft's Attitude and Base Coat Range.
The design is based on Astrid Mclean's Booklet Tag Card.   I love the style of this card (you've probably noticed I've used it quite often) especially for male cards.  Not sure exactly why but I guess it just suits my 'masculine' style a bit better.

 The stamps I've used are BoBunny's Stained Textures.  The cracked paint and the paint splatters were done with Walnut Stain Distress Ink through templates from ScrapBook n Craft. 
The chipboard clock and the Cog Border are also from Scrapbook n Craft.  The single cog pieces are from Imaginarium.  All of the chippies were coloured with Versa Magic 'Midnight Black', Versa Color  in 'Silver', 'Bronze' and 'Lapislazuli' and Kaisercraft 'Red Gum'.


 The front of the card was decorated with some plaster tape (which is available from any Hardware Store) some of the 'Base Coat' paper cut into strips to resemble wood planks (an idea I 'lifted' from Adriana Bolzon .. you can find her blog and her wonderful creations HERE) and a piece of brick wall, a printable clock, a corrugated tag, some chippies from Imaginarium and even a metal washer.  I also wrapped a piece of Crafter's Cord around it and added a couple of brads as well.

A close-up to show the colouring on the chippies.


Sorry guys, didn't realise this post would be so long but, there it is.  My oldest son's Birthday Card.  Happy to say it was very well received.  Hope you liked it too.

Thank you so much for visiting and a huge thank you to all you lovely people who leave me such warm and encouraging comments.  I really, really appreciate them very much.  
I'd also like to wish all my American visitors a very Happy Thanksgiving!!

Please take care and God Bless.
oxox Marg

Saturday, 23 November 2013

Birthday Easel Card

Hello everyone.  A warm welcome to  my blog ... so pleased you are here.
Hope you are having a great day and that the weather wherever you are is exactly how you like it!!
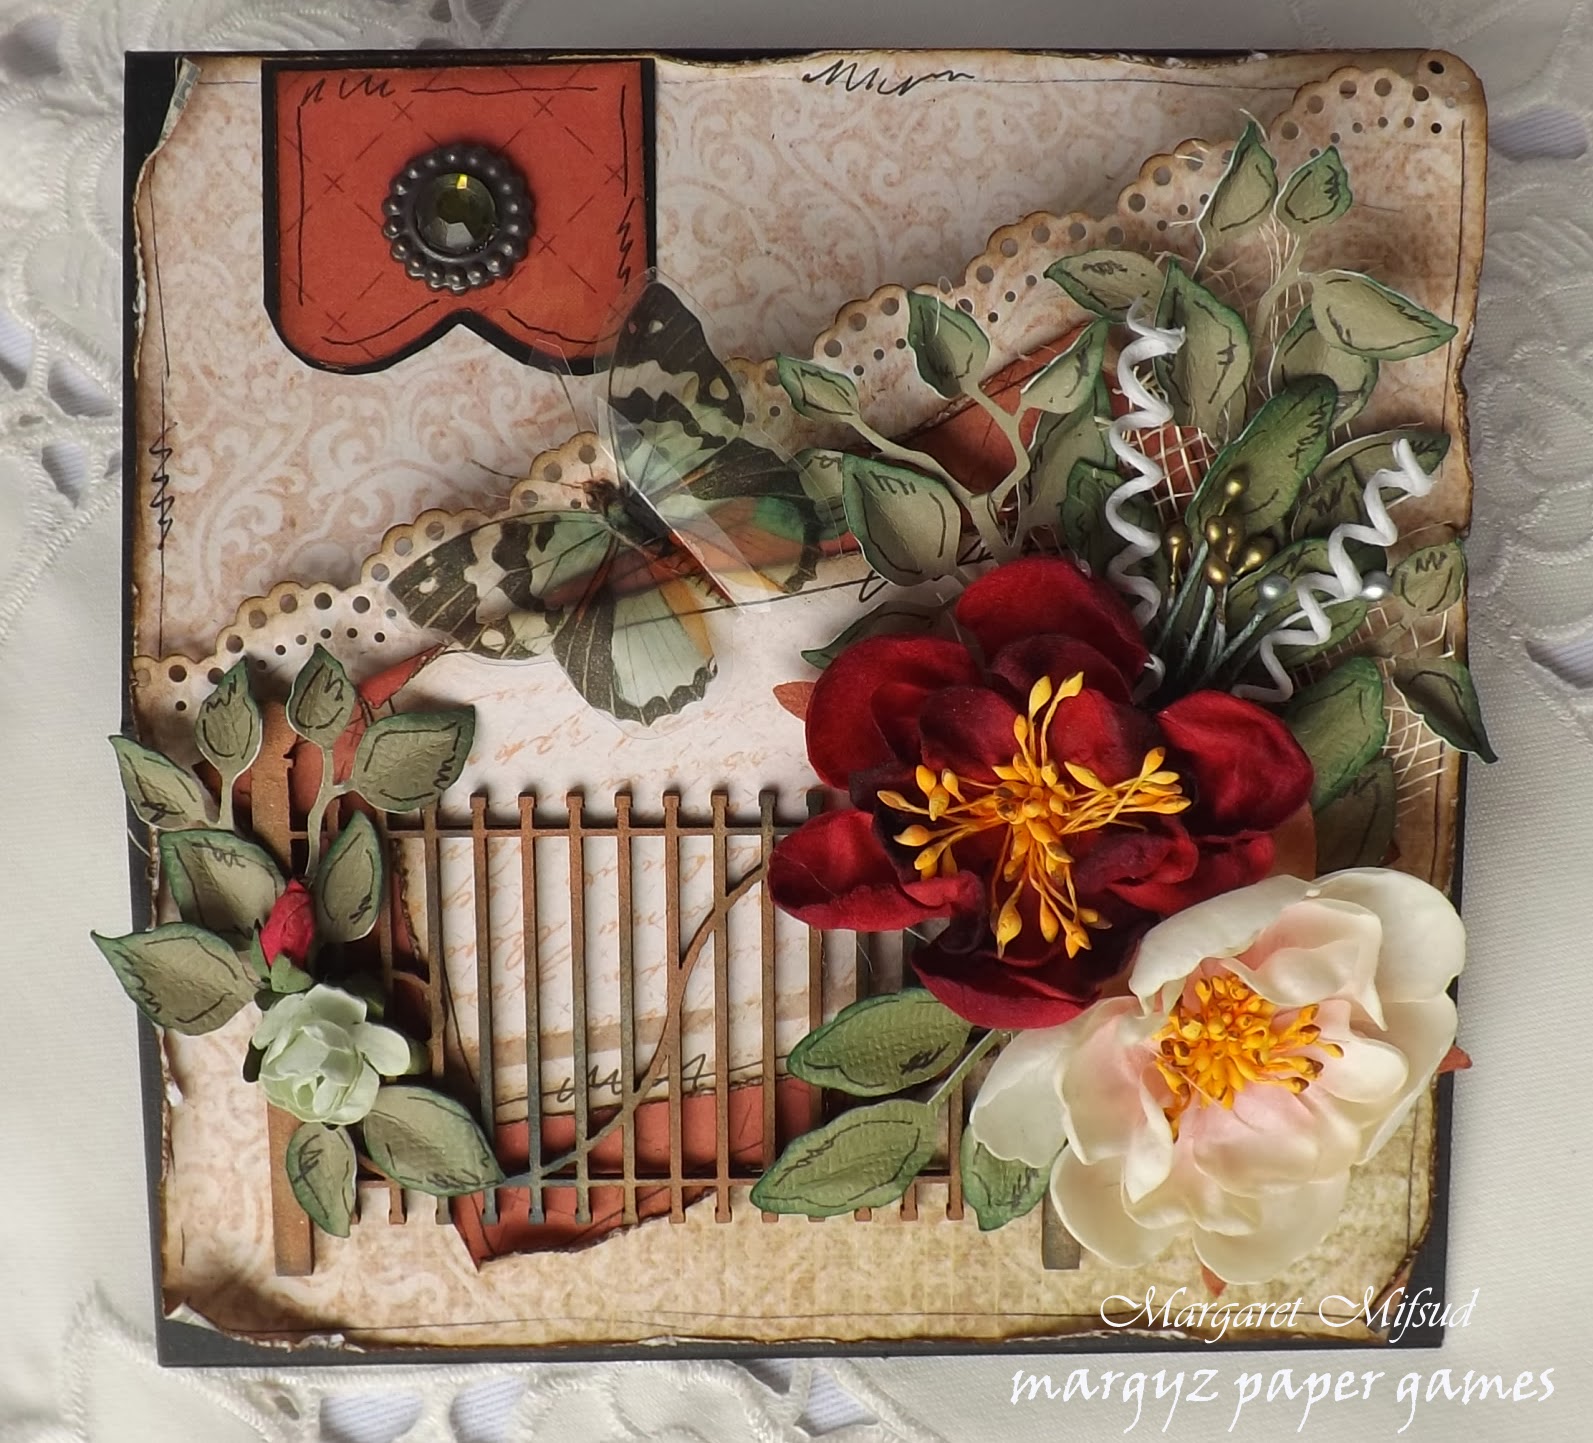
I'm sharing an Easel Card with you today.   It is my daughter-in-law Kerry-Jean Watson's birthday today and this is the card I've made for her.  Actually it's a bit like taking coal to Newcastle, making cards for Kerry-Jean, simply because she makes cards as well, and really gorgeous ones too.   You can check out her blog HERE.
The base is black cardstock and the papers are a 12 x 12 sheet from Kaisercraft's Sweet Nothings and another 12 x 12 from their These Days Collection.
The base paper on the front was cut on the diagonal and border punched with Martha Stewart's Doily Lace Punch.
Here is how it looks standing up.
I needed an embellishment in the top left corner of the card as it looked a little empty when closed.  Tried a lot of different things but nothing was quite right.  I'm sure you all know how that goes, right?  It's a pain!!  You sort of know what you want but nothing works, until I paid a visit to Heather Jacob's Blog and, surprise! surprise!, found just what I was looking for.   On her last layout, at the top of the page,  she used a lovely little tag and button and voila!! that little light went on in my brain ...  just what I want for this card!  Her tag is prettier than mine but I'm really happy with this,  it was perfect!  Thank you again Heather, I always know where to go for inspiration.  You can check out Heather's blog HERE.
The gorgeous acetate butterfly is from Designs-Galore which can be purchased at Meg's Garden.com.   You should check out the store, lots of yummy goodies to be found there.  HERE is the link.
The chipboard gate is from Twiddleybits and has been coloured with Versa Color Lapislazuli and Kaisercraft Red Gum.  The small rose is also from Kaisercraft but I'm not sure where the bud is from,  that has been in my stash for a while.  The leaves were cut with my Silhouette Portrait and inked with Versa Color Emerald Green.
The large flowers are from Prima  and I've just added some netting, some stamens and a couple of wire twists to the cluster.
The inside was covered with the same papers.  The greeting and the sentiment were printed on  my computer and then the shapes cut out around them.   I edged the Happy Birthday tag with Adirondack's Gold Acrylic Paint dabber  but I used a brush to apply it.
The wooden flourish is Kaisercraft's Fancy Border and it's been coloured with Versa Color Lapislazuli and Bronze and also Kaisercraft's Red Gum.
You know, the best part about making your own cards is the look on people's faces when they first see what you've made for them.  I'm really happy that Kerry-Jean was pleased with this one.

Thank you so much for visiting, I do hope to see you back again.
Enjoy the rest of the weekend.
Take care and God Bless.
oxox Marg

Sunday, 17 November 2013

An Anniversary Card with a Difference ...

Hello there everyone ... welcome to my blog.  Hope you are all having a great day.
I've been away for a little while and, strangely enough, I'm having trouble getting back into the swing of things, but I would like to share a card with you.  
My son and his wife celebrated their 20th Wedding Anniversary last week and this is the card I made for them.
 As you can see by the title of this post this is a card with a difference and that difference is that it is almost a Mini Album.  I decided to put a few photo mats inside so they could take some photos of their celebrations and use the card as a keepsake.  
 It also has a few journaling cards in there as well.
The papers used are a mix from Kaisercraft's 6 x 6 Curiosity Paper Pad and also some 12 x 12 pages from their Vintage Timeless Collection.  I have also included some stickers and tags from G45's Romantique Collection.  All the papers were distressed around the edges and then inked with Walnut Stain Distress Inks.
Made some quarter circle pockets and edged them with a strips of pearls and also did a little stamping with a Kaisercraft Stamp.
The small bling hearts are actually from Office Works!!


 Made two pocket pages and two photo mats and also added a few butterfly strips from G45.
The sentiment was printed on a sheet of paper from Kaisercraft but I'm not sure which collection it is from.  I  then cut the tag shape out on my Cuttle Bug, embossed the edge and painted that with gold.
Here is a close-up of the flower cluster on the front.   The large flower is from Prima and the small roses are from Kaisercraft.  Added some gauze and a few stamens too.
  I also added a few strips of music washi tape.
For the closure I simply cut the shape out of cardstock by hand added the extra layers with the greeting and glued it down to the front at one end.  I've  used a small piece of velcro to keep the card closed ...
and there you have it.  Not just a card, not really a Mini Album but, rather a mix of both.

Thank you so much for visiting and I would love it if you would take the time to leave a little comment to let me know what you think.
Take care and God Bless.
oxox Marg

Saturday, 2 November 2013

Art Journal page - Just Breathe

Hello everyone, thank you so much for visiting.
I have another Art Journal page to share with you.  I wasn't actually going to post this one because so many things just didn't go right with it and I almost tossed it in the bin.  It was my lovely friend Heather Jacob who persuaded me that it wasn't a total loss, mind you she hasn't seen the finished product so maybe she'll change her mind ... LOL.  
She actually loved the background and I must say I do too.   The base colour was laid down using Walnut Stain and Faded Jeans Distress Inks.  I used the Walnut Stain again to randomly stamp around the page with the Arty stamp and  script stamp from Kaisercraft.    It was the texture paste that was the first thing to go wrong.  I used the Crafters Workshop Mini Ledger Stencil and it looked great but as it was drying the paste started to bleed into the paper.   Not happy Jan!!!!  Won't tell you which brand texture paste I used but I just wanted to throw the whole thing out.  This was the stage Heather saw it and persuaded me to do some more and see what happened.  
I was going to cover up the script but then decided to leave it as is.  After looking at it for a while I decided it wasn't a big issue and I could live with it.  So I said to myself  'just breathe' and think of what to do next.
So I added some flowers.
 Cut out some random flower shapes, stamped them with a KC stamp and coloured them with a mix  of Distress Inks and Reeves Water Soluble Wax Pastels.  Must say, I do like how they turned out.
 I originally had some paper flowers glued to the bottom of the page but again, didn't like it, so took them off again and added the hearts which were also stamped with a KC stamp and coloured with Distress Inks.

I went around the edges of the flowers and the hearts with the Wax Pastels in black and went around the edge again with a wet paintbrush to blend it a little and that went wrong too.  I made a mess.  Tried to fix it but it didn't work too well so, again, I left it.  Take a deep breath I said to myself and keep going.
There really wasn't much more I wanted to do except perhaps add a few words.  Thought about it and decided to add what I had been saying to myself all along.  'Just Breathe'.
Coloured some paper with the Faded Jeans, wrote the words and cut them out.  I then edged the pieces with Walnut Stain and glued them to the page.  And, of course, when I outlined it with the wax pastels and tried to blend it, I did it again ...  made a mess.  But, you know what, I figure this page is just for me.  I haven't made it to give to someone, it is just for me to have a little bit of creative time for myself.  So, what the heck!!  Doesn't matter if I made a mess and, funny enough, I actually do like it.  Probably because it was a pain to put together, but now it's done I can look back at it and say 'so what' if it didn't turn out the way I imagined and 'so what' if no-one else likes it.  It's mine and I can look back at it and laugh at myself for taking it all so seriously!!!!
Done!!!  Finished!!!!
"Just Breathe' !!!

Thank you so much for visiting, hope you enjoyed it a little bit.
Take care and God Bless.
oxox Marg